Lasted and welted footwear
A quick review of terminology before I launch into detail.
- A last is a wood or resin shape that is used to make the pattern and, often, to assemble the shoe.
- A welt is a strip of leather that’s used to attach the upper part of the shoe to the sole.
- In a double-welted shoe, the stitches that attach the welt to the upper are visible; in a single- welted shoe, they are hidden.
- In both double-and single-welted shoes, you may be able to see the stitches that attach the welt to the outsole.
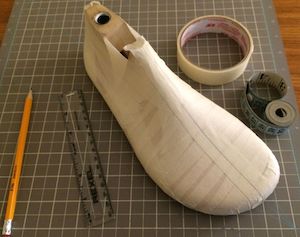
My wooden last covered with masking tape that will be removed and stuck to card to start making the patterns for the upper and lining. Note the slight wrinkles in the tape at the end of the toe area, and the straight line marked down the center of the last. Also note the highly asymmetrical shape of the wide toe area.
Below, I outline the basic process for making a pair of lasted and welted shoes. I have made several types of shoe this way, from low court shoes, to calf-height boots. Some lace up down the front like Oxford or Derby styles, others have been side-fastening.
I have invented my own method of making and attaching single welts. I think it is much simpler for the beginner shoemaker than the traditional method of making single welts from a strip of leather and a very thick insole. I have been wearing shoes made this way for several years: so far their welts have stood up to a great deal of wear (although they have needed new rubber soles gluing on due to the thousands of miles of wear I have put on them).
Step 1: Choose your last
I had great trouble finding a last that would give me the foot shape I wanted for my shoes:
- No heel at all (zero drop)
- Ample toe room: the toe area as wide as, or wider than, the ball of the foot
All off-the shelf lasts I could find had some sort of raised heel combined with tapering toes. Fashionable, maybe, but terrible for feet. Therefore, I had to get lasts custom-made to my foot measurements: very expensive, but when the cost is spread across dozens of pairs of shoes, I felt it would be worth it.
Step 2: Tape up the last, and mark the pattern
The first step is to cover the last (all but the sole) in masking tape. The pattern will be drawn on once the last is covered, and some key lines and reference points marked on.
Covering the last with masking tape is easier said than done. The aim is to eventually pull the masking tape off the last and stick it to card, in order to create a 2-dimensional pattern. Therefore, it’s important to put the tape on in such a way that it doesn’t distort too much when pulled off. I add tape in overlapping layers, working first from toe to midfoot and then heel to midfoot.
Mark reference lines and points
Over the ages, shoemakers have discovered that it’s very useful to use certain characteristics of the foot when making robust footwear. These include:
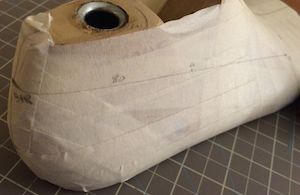
The heel and of the taped last, showing some key measurements marked: the Back Heel Point, the stay point, and the line connecting the two which gives default ankle clearance (A).
- A center (or centre!) line down the front of the forefoot. I draw a straight line on a piece of masking tape, and then eyeball where to stick it to divide the forefoot into two equal halves
- A center line down the heel. As with the front center line, I add this by sticking on a piece of masking tape with a straight line marked on it.
- The Outside Joint Measurement (J). To find this, first locate the part of the last that corresponds with the metatarsal joint of the smallest toe. Draw a line OC from this outside point to meet the center line at right angles, then measure J as the length of this line. For me, J was 80mm on the left foot and 81 mm on the right foot.
- The Stay Point is the point half way between the center line and the outside joint (it sits on the line OC), and is an important reference point when thinking how the shoe will get on and off the foot.
- The Vamp Point. This sits further towards the toe than the point where the centerline intersects with the line OC. Specifically, it sits Vmm down from the intersection of the center line and the line OC, where V is calculated as (Jx2)/10. For me, J=80, so Jx2=160 and V=16. In other words, the Vamp Point is 16mm towards the toe from line OC. Typically, if you want to get the shoe off the last easily, you want to make the closed part of the vamp end around this point.
- The Instep Point. This is usually measured as Jmm up towards the leg from the Vamp Point. However, if the point is more than about 20mm from the top of the shoe last, it can be adjusted upwards or downwards using some rules of thumb. Often, you want to end a shoe no higher than this point.
- The Back Heel Point (BHP). This is a useful reference point on the heel center line, marking a good point to end the back part of the shoe. One finds it by doing a calculation based on shoe size. For an EU 37 shoe size, measure 54mm up the heel center line from the point where the sole starts. For each shoe size above 37, add 1.5mm. My shoe size is 40.5, which is between 3 and 4 sizes above 37. Therefore, I measure 59mm up from the edge of the sole (54+(3.5*1.5)=59.
- Connect the BHP to the Stay Point with a straight line, then measure Jmm along this line from the BHP. On many people this gives a point A which is the position of the bottom of the ankle bone. However, on my feet the ankle bone is lower than this, and I found A by measuring my actual feet and then transferring these measurements to the last.
Tape stuck to card, with as little distortion as I could manage. Note the slits at the toe and heel area, to allow the tape to go flat. Also note the wrinkles marking other distortions. After flattening, I marked 20mm around the margin: this gives a good size flap (a lasting margin) to nail onto the bottom of the last later on.
Now draw the pattern
Using sharp, soft pencils, draw the shoe pattern onto the last. I like to use colored pencils to show different parts of the shoe.
Step 3: Make a card pattern
Now comes the tricky part. The tape needs to be removed from the 3D last and stuck onto card. This always results in distortions: the tape wrinkles or wants to stretch when it is stuck down.
The way I was taught to remove the tape by a professional shoemaker was to cut down the center front and back lines using a scalpel, and then to remove each half of the pattern in turn.
But I found it was generally much faster and simpler to cut the pattern off in pieces that corresponded to the major pattern pieces I eventually wanted to stitch together to make the shoe. I used a scalpel to cut out along the relevant lines of the pattern before peeling the tape off.
I then stuck the tape carefully to card, making sure to leave enough room for seam and lasting allowances (more about these below). Where the tape had been pulled around the curve of the heel and the toe, I cut small slits to allow it to sit more-or-less flat on the card.
Lasting margin
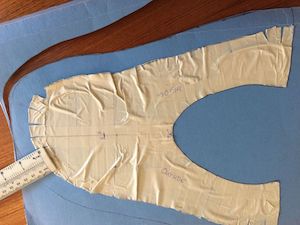
The pattern for the upper and the heel, together with a cloth prototype. Note the slits in the large part of the pattern marking where the stitching lines are (the leather between this line and the edge will be skived before stitching on the the leather of the heel section).
When the leather of what will become the shoe’s upper is pulled over the last, it needs to be nailed onto the sole of the last. Therefore, the pattern needs to include a lasting margin to allow this nailing to take place. It needs to be wide enough not only for tacks to be hammered near to the edge of the sole, but also for pliers to grip the leather to pull it tight ready for hammering. Therefore, I add 20mm to the bottom edge of the pattern as a lasting margin.
Seam allowances and skiving
If the leather is thick (say 3mm or more), two pieces of leather could be sown together using a butt joint: the leather edges are butted up to each other and stitches hold them in place edge-to-edge.
However, with thinner leather, or for design reasons, one needs to overlap the two pieces of leather slightly before stitching them. Therefore, one needs to add a seam allowance to one or both pieces of the pattern. For a closed seam, such as the seam used to stitch the welt to the outsole, I use a minimum seam allowance of 2mm. For an underlay seam, such as used to connect one piece of the upper to the other, I use an 8mm margin and skive the piece of leather that lies under the piece that shows.
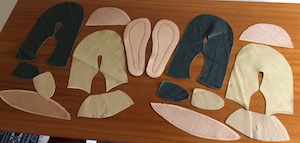
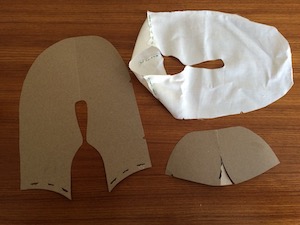
When making a pair of sneakers, these are just some of the pieces I created patterns for: uppers, lining, stiffeners, and soles. The almond-shaped counter stiffener at bottom left has clearly been skived around the edge.
Skiving means shaving the edge off, so that the thickness of the two pieces of leather increases gradually towards the seam rather than abruptly at the point where the underlying leather starts.
A lining pattern as well as an upper pattern
If the shoe is to be lined, one has to make a lining that fits inside the upper. The seams of the lining should not unduly overlap the seams of the upper (double-thickness seams might rub: ow!). So now that you have finished the upper pattern, make the pattern for the lining!
Stiffeners
Many lasted shoes are made with a rigid toe box, and a heel that stands upright on its own (it does not slump). To get these characteristics in a shoe, you need to make patterns for toe and counter stiffeners. You may also want stiffeners in other parts of the shoe, depending on the design. All these need to be given a pattern, with relevant lasting margins.
Soles and welts

Parts for the tozafoot method of welting: a midsole surrounded by a welt, before the midsole is sewn to the insole, and before the welt is dyed.
The last pattern pieces to make are those for the soles and welts. Here, you need to have decided what type of welting method you will be using.
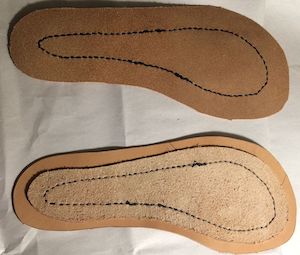
The basic insole pattern is made by drawing around the perimeter of the last onto a piece of card. Depending on what method you will be using, you may also need to make midsole and welt patterns based on this tracing, as explained in step 7 below.
Step 4: Make a cloth prototype
Once all the pattern has been cut out and carefully labeled, it’s time to start sewing.
Unless I have already used the pattern, I mock the shoe up in cloth before making it in leather. It’s a lot less expensive to make a mistake in cloth than it is in leather!
For prototyping uppers and linings, you need fairly heavy cloth, that is as thick and dimensionally stable as thin leather. I find that the material sold to make blackout curtains works well.
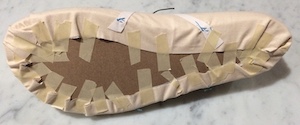
Prototyping a pattern in cloth and cardboard, before making it in leather. Here I am using masking tape, not glue, to check that the upper will pull onto the insole with an adequate lasting margin.
For prototyping insoles, I simply use thick card. It is possible to get card specially formulated for sole-making, but my budget does not run to it.
To fix the cloth uppers to the card insoles, I just use masking tape. I can’t stand to breathe in fumes from the solvent-based glues that many professional shoemakers use, and I find that masking tape allows me to fix errors on the fly much easier than glue does.
The mockups allow me to check the general fit of the shoe, and make adjustments. I generally make the adjustments using masking tape, then unpick the mockup so I can lay it flat to adjust the card pattern as necessary.
If making lined shoes, don’t forget to make mockups for the linings and stiffeners as well as for the uppers! However, I don’t ever go so far as to mock up the welt or outsole.
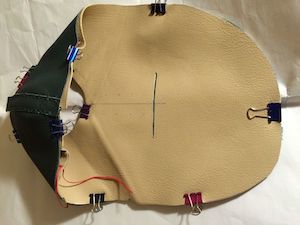
Getting ready to sew the lining to an assembled upper. Bulldog clips come in handy to hold everything in place for stitching.
Step 5: Cut out the leather
Once confident the pattern will fit the foot, it’s time to cut out the leather. Depending on the type and thickness of the leather, I might use a scalpel, a knife or a pair of fabric scissors. Using scissors would probably horrify most professional shoemakers, because the edges of the cuts are much more likely to be angular and ragged, but I find that scissors are much faster than a knife and much less likely to hurt my hands!
Step 6: Construct the upper and the lining
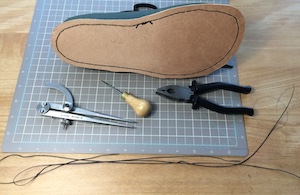
Having already constructed the shoe in cloth makes it easier to know how to hold and sew the leather. I sew everything by hand. I pre-punch seam lines using a punch or chisel, and double stitch using 0.8mm Tiger Thread and two saddler's harness needles.
Once I have the upper sewn together, and the lining constructed, I sew the upper to the lining along the top of the shoe and other relevant seams. It can be easier to trim the lining after it's been sewn to the upper.
On the right is a "tozafoot method" single welt (upside down, so this is the welt for the left foot). On the right is the corresponding welt for the other foot, with its midsole (marked with a red pen stitching line) sitting just inside it. In the center is the left-foot midsole (again marked with red pen) sitting on top of its insole. Note that the perimeter of the welt is slightly larger than that of the insole.
Step 7: Assemble the shoe on the last
By looking at a few books and trying some things out, I have taught myself how to make shoes on a last, using double and single welts.
Welting the tozafoot way
For single-welted shoes, I have developed my own method, to fit the materials and tools I have available, and to avoid using solvent-based glues. I have been wearing a variety of shoes and boots made this way for several years and am pleased with how well they stand up to rugged wear on sidewalks, tarmac and rocks.
Professional shoemakers make a welt from a single strip of leather, like a narrow strap. They bend this strip around the toe, and sometimes around the heel. I used this method several times when making a double-welted shoe or boot. For the welt material, I have tried 4oz goatskin (nightmarishly stretchy) and 5oz cowhide (much better).
The topside and bottom side of a tozafoot custom sole, ready to attach to the last. The smaller midsole has been stitched the insole, which is the same shape as the bottom of the last.
For my tozafoot method of single welting, I don't make the welt in the traditional way, from a strap of leather. Rather, I cut out a welt in the same shape as the sole, from the same 4-6oz cow leather that I use for the midsole (see photos). This results in very little leather wastage.
My method also uses a different technique to form an attachment for the welt under the insole. Traditional shoe makers cut a slit/groove in the bottom of the (thick) insole and use this to attach the welt. However, I wasn't using high quality leather to make my shoes, and I also lacked the tools and experience to cut a neat groove. So instead, I made a midsole to sew the welt to, and sewed this firmly to the insole. Functionally, it acts in the same way as the traditional attachment method, and it is quick and easy to do, especially with veg-tanned leather that is not very thick or high quality.
Below, I briefly describe my "tozafoot method". I also illustrate it in a couple of other photo essays: for court shoes, and side-fastening shoes with trompe l'oeil toes.
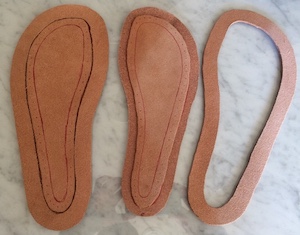
7.1. Cut out insole, midsole and welt
The first steps of my method involve cutting out an insole to exactly match the sole of the last, then a midsole that is the same shape as the insole but about 10mm smaller all around. The leather around the midsole cut-out is then used to make the welt, which is again the same shape as the insole but a few mm wider all around.
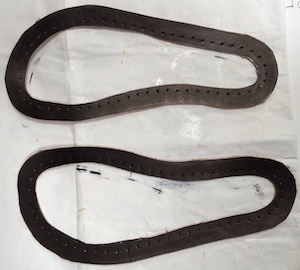
Topsides of tozafoot-method single welts after punching stitching holes 8mm apart and ~3mm from the inner edge, then dying. On the undersides, I’ve skived the inner edges, and scored a groove in which the stitches will sit. The midsole is cut from the leather that formed the center of these shapes, so there is very little leather wastage.
The midsole is sewn to the insole, leaving enough of a margin next to the midsole edge such that, later, holes can be punched through the midsole with an awl. I have also tried pre-punching these holes in the midsole before sewing it to the insole. On balance, having tried both techniques several times, I find it easier to make the holes in the midsole as I go along, rather than prepunching holes in the midsole.
7.2. Skive, punch, and dye the welts
The inside 5mm or so of each welt needs to be lightly skived, so that the welt doesn't form a bulge under the foot after it has been sewn on.
I either pre-punch stitching holes in the welt, or make them with an awl as I stitch. To pre-punch, I use a metal punch to make a ring of holes all the way around the inside of the welt, about 4 mm from the inner edge (just as the skived area starts). Stitch intervals between 6mm and 8mm have worked best for me: less than 6mm and it becomes fiddly to connect welts to midsoles; more than 8mm, and I worry about the strength of the attachment between upper and midsole via the welt.
Note that the holes to attach the welt to the shoe are punched through the part of the leather that has been skived, so it's important not to skive too thinly: the leather has to retain enough strength for thread to be pulled tight through it without breaking it.
It's too fiddly to dye the welt surfaces after assembling the shoe, so if they need to be a different color, make sure to dye their top surfaces before starting to sew them on.
Dying should be done after punching, so that the insides of the punched holes are dyed.
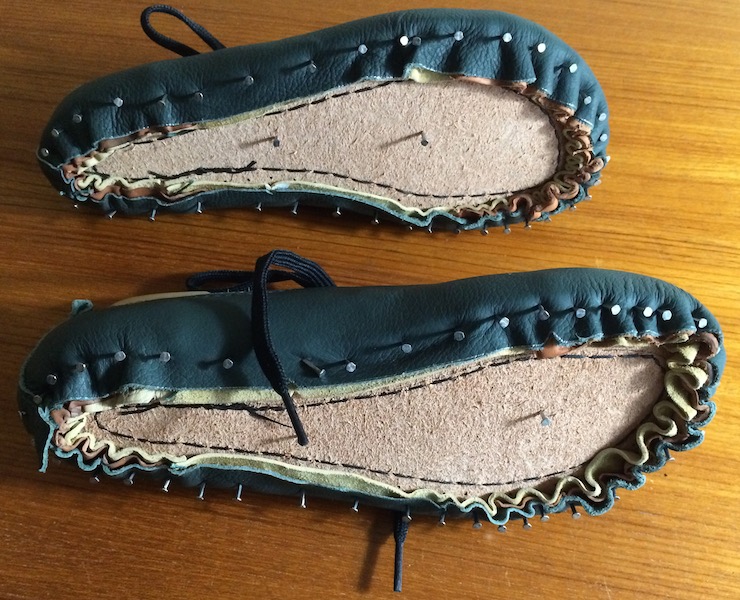
Two shoes with soles and uppers tacked to the last, ready to trim and welt. Lasting needs a good pair of lasting pliers, plus specialist nails, and a hammer to knock out any wrinkles in the upper around the edges of the toes and heels.
7.3. Nail/tack to the last
I nail the combined inner/mid soles to the last, and then tack on the combined upper, liner and stiffener. Sounds easier than it is! It’s particularly tricky to avoid getting creases in the leather around the tight curves of the heel and toe areas: I use a very narrow pair of lasting pliers, and make sure to tack the leather on in a particular order (center heel, center toe, instep, outside midfoot, then at the mid point of the four quadrants thus created, then at the midpoints of these, and so on).
For toe and heel stiffeners, I use 4-5oz vegetable-tanned leather, soaked for at least 12 hours in water. Just before I stretch the shoe over the last, I coat the stiffeners in water-based glue on both sides, then stick them in the correct position between upper and lining. I then pull the whole set of layers onto the last and nail it in place ready for welting, while the stiffener is still wet and pliable. I find this is much quicker than the way I was taught. That method involved lasting each layer one at a time (lining, then stiffener, then upper), and fixing it in place with solvent-based glue before lasting the next layer. My all-in-one method also avoids the possibility of breathing in toxic organic solvents from glue.
Trimming the upper, liner and stiffener before welting. Note how the trimmed edges lie just next to the midsole.
7.4. Trim excess upper, stiffener and lining
This is the trickiest bit of the whole process: trimming the excess upper, stiffener and lining lasting margin. The aim is to take off enough so that it doesn’t bunch up to make lumps under the midsole, but not so much that attaching the welt becomes difficult.
I find it best to trim before welting, to avoid damaging the welt during trimming. Also, if I am using stiffeners at toe and heel, it can be easier to trim the stiffener leather while it is still damp and somewhat pliable.
I use a combination of knife, scalpel and scissors to cut the leather back to the point where it lies pretty flat against the underside of the insole but there is still enough left to hold the welting stitches nicely and butt up against the mid sole when the welt is attached.
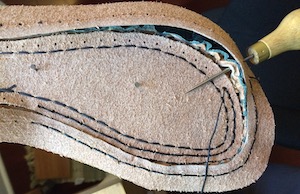
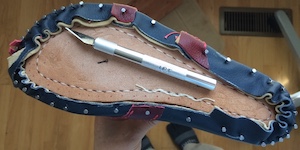
The tozafoot method of single welting. An awl is used to punch holes in the upper, lining, stiffener and midsole, via a prepunched hole in the welt. Thread is then drawn through these holes using curved needles. Note that the welt nearly butts up to the midsole when attached. Also note that the trimmed upper, lining and stiffener (green, tan and pale layers in this photo) fit neatly under the welt.
7.5. Sew the welt to the upper, lining, and midsole
Attaching the welt to the midsole, through the combined layers of upper, lining and stiffener requires an awl and lots of strength (see photo). Curved needles also sometimes come in handy.
When sewing soles I use 1mm thick thread, rather than 0.8mm thread, because I want especial strength in this part of the shoe.
7.6. Next lot of trimming, followed by infilling
Once I’ve sewn the welt on, I do any final trimming that might be necessary, taking great care not to cut into the welt.
I then cut and skive pieces of goatskin to fit the space within the perimeter set by the welt, and glue them in place with a water-based glue.
Note that professional shoemakers might use a cork compound to fill this space. I decided not to do this for several reasons. Most importantly, I wanted to avoid the organic solvents used in these cork products. Also, I wanted a flexible sole, but the cork tended to dry stiff, which defeated the object.
The area inside a single welt has been infilled with soft goat leather. Seen from the side, the area within the welt is flat: this shoe is ready to have the outsole attached.
Rather, I find goatskin is nice and spongy, and exceedingly flexible: just what one needs under one’s foot!
The end result is a sole area that is flat side-to-side and end-to-end over the whole midsole area within the welt.
7.7. Make and attach outsoles
I cut my outsoles from 10-12oz cow hide. This is pretty stiff, and requires a good knife to cut. First, I put my welted shoe onto the hide, and draw around the perimeter of the welt. This gives me a rough shape to cut out: no need to be too neat at this stage, as it will be trimmed later.
Next, I put a a few dabs of waterbased glue onto the upper side of the sole and the bottom side of the mid sole, hammer out any airpockets, and use bulldog clips to clamp everything in place until the glue dries.
Holes punched with an awl through the the outsole, to match the holes in the overlying welt. This is from an early effort: I am getting better at making sure my holes are nicely aligned. I have also carved a groove (about 1mm deep) to connects all the holes; the stitches will lie in this groove. Notice the rough edges of the sole that will be trimmed in a later step.
Next, I push an awl through the welt and the outsole, making sure to space the holes as evenly as possible on the upper side of the welt. A pair of calipers and a silver pen can come in handy here. Sometimes, I prepunch holes in the welt beforehand, so I then just have to push the awl through the outsole.
Once the holes are all made, I carve out a groove connecting all the holes in the bottom of the outsole. The thread holding the welt to the sole will sit in this grove. The whole groove will be covered by a rubber sole later, so it needn’t be ultra neat.
Ready to sew! Again, I use 1.0mm Tiger thread for robust stitches.
I’ve sewn the welt to the sole (needed pliers to pull the needles through) and hammered the stitches flat into the groove. Next, the sole needs trimming and dying.
7.8. Trim, sand and dye
Once the outsole is attached, I need to trim it, and also trim the welt if necessary. I use a very sharp knife to do this by eye. I generally remove the shoe from the last in order to trim the outsole and welt: makes it easier to avoid nicking the upper with the trimming knife. A lip knife is best for this.
Once everything is neatly trimmed, I can sand and rub the edges of the outsole and welt to get them smooth (optional!) and then dye them to match the top of the welt.
Step 8. Rubber sacrificial soles for wear
I am a pretty heavy walker, wearing down the heels and forefoot area of my shoes through walking 4+ miles per day on concrete and tarmac. If I tried to walk with just the leather outsoles attached, I would quickly wear through the stitches holding the outsoles to the welt. Therefore, I glue Vibram rubber soles to the bottoms of my outsoles. This is the only stage of my shoemaking in which I use solvent- based glues, and I hate it. But it’s necessary, and I do all my gluing outside to minimize the fumes I breathe in.
A pair of double-welted boots photographed just before the final trimming of rubber soles to match the overlying leather outsole.
I place the shoe on the sheet of rubber soling material and check this gives me roughly the tread pattern I want. Then I draw around the shoe with a silver pen, to give an outline shape on the sole.
Next, I score the leather of the outsole and the rubber of the Vibram sole lightly with a scalpel. I might even sand it using rough sandpaper: there needs to be a good surface for the glue to stick to.
I then go outside and put everything on cardboard or sheets of newspaper. I use a plastic knife to spread barge cement liberally on the surfaces that will be stuck together, making sure to spread it well outside the silver outline marked on the rubber sole.
After waiting the recommended amount of time, I carefully press the rubber sole to the outsole, trying to fit the latter within the silver outline of the former (with varying success!). Once everything is in place, I put my hand inside the shoe to push down hard on all parts of the insole, before adding large bulldog clips all around the edge to hold everything firmly in place while the glue dries for 24 hours.
The following day, once the glue has dried completely, I trim the rubber sole to match the outsole, again with a very sharp (lip) knife.
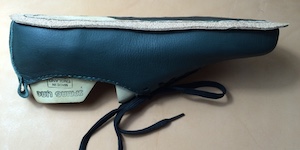
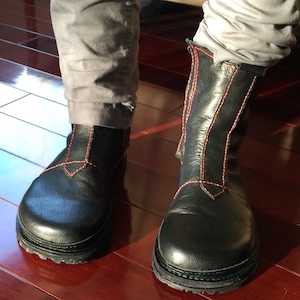
End product: handmade shoes that look shop-bought!
I have made several pairs of shoes and boots with lasts, and have worn some of them for half a decade or more. I haven't posted all of them on this site, but here are two photo essays that illustrate the process of lasting and welting with two different styles of shoe:
- Making court shoes on a last
- Side-fastening shoes with trompe l'oeil toes: how I used design features to make the shoe shape look much less wide-toed than they really are.