Stitch-down / sew-down: fast unlasted shoes
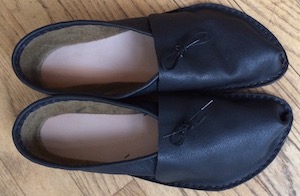
Fast unlasted stitchdown shoes. This is a pair I made for my spouse using the method outlined below.
I had already made several pairs of shoes without using lasts, by attaching uppers to soles with a mocassin-type method. Each pair took about 20 hours to make, much faster than the 80-120 hours for a lasted pair. But I wasn’t too keen on the frilliness of the frill sole, nor the fact that it gave me a chrome-dyed piece of leather under the sole of my foot.
I wanted something slightly more elegant, and I wanted my bare sole to make contact with a nice piece of vegetable-tanned leather. In short, I wanted to try another way of:
- making patterns and assembling the shoe without having to use a last (Step 1 below);
- sewing the uppers and soles together without using a moccasin technique (Steps 2 and 3 below); Since the upper is simply stitched down onto the sole, I refer to this style of shoe as a stitch-down or sew-down shoe.
1. Patterns without duct tape or masking tape (almost)
To make patterns for mocassin-style shoes and lasted shoes, I had covered a foot or last in duct tape or masking tape as an early stage in the pattern-making process.
Here, I wanted to see if I could make a simple pattern without having to resort to any kind of tape, whether duct, masking or something else. I nearly managed: I did need to use a single piece of tape with a straight line drawn on it.
1.1. Make a "sole cut-out" with some key points marked
This just needed a piece of card, a pencil and a pen. I stood on the middle of the card, and held the pencil vertically to trace an outline of my foot onto the card. Next, I held the pencil at about 45 degrees to the card and traced under the side of the foot where the arch was above the card. Then I used the pen to mark some important reference points:
- The big and little toe metatarsal joints. As well as marking where the sides of the joint met the sole outline, I tried to mark the points on the sole outline where these joints protruded most (points B and L, respectively).
- The instep bump. This is what I am calling the slight bump on the upper part of the foot, above the arch. Mine is quite pronounced; my spouse’s is almost unnoticeable. I find it painful when shoes press on this bump, so I wanted to mark where it occurred. I put a fabric measuring tape across my foot, with its edge on the middle of the bump, and marked where the tape met the outline of my sole. I also eyeballed where the bump sat when looking at my foot in plan view, and marked this point approximately on the card.
- An index-finger’s width beyond each of the toes.
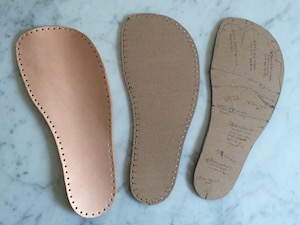
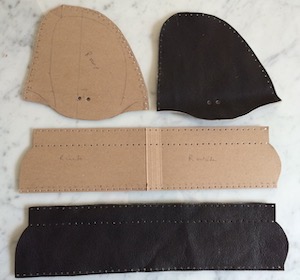
Stages in sole construction for fast unlasted shoes. On the right is the annotated outline of my foot: the sole cut-out. In the middle is the pattern I made from it, and on the left is the leather sole based on the pattern.
I then removed my foot from the card, and used the pencil to draw:
- A smooth freehand line connecting the points at the sides of my toe joints and the points a finger’s width beyond the ends of the toes. This gives the shape of the toe-end of the sole (see photo below).
- A line roughly halfway between the pencil marks made by holding the pencil vertically at the arch and those made by holding the pencil at 45 degrees to the card. This gives the sole outline on the inside of the foot between the toe joint and the heel.
- On the outside of the foot between the little toe joint and the heel, the outline of the foot bulged outwards slightly; I removed most of this bulge by drawing a smooth line by eye.
- Several reference marks intersecting the outline drawn above:
- H: at the center of the heel
- C: halfway between the instep bump mark on the inside edge and the big-toe joint mark B
- K: halfway between the instep bump mark on the outside edge and the little-toe joint mark L
- T: the point of maximum curvature at the big toe
- X: a point about a finger-width down from the tip of the big toe
- Y: a point about a finger-width down from the top of the third toe
- S: the point that coincided with the side of the second toe closest to the big toe.
The next step was to cut out around the outline marked by the above freeform lines. This yielded an annotated sole cut-out (right-most piece of card in photo below).
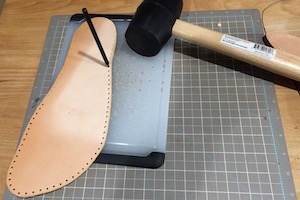
Using a 00 punch to make the holes in the sole to which the upper will be stitched down. Holes are 8mm apart, and 2mm from the edge.
1.2. The sole pattern
I wanted the stitching line that connects the upper to the sole to run along the outline of the sole cut-out as made in the previous step. Therefore, I had to make a pattern that had the positions of the stitches marked (the left-hand piece of card in the photo above). So I:
- took a fresh piece of card and traced around the sole cut-out, making sure to also transfer the positions of the reference marks
- used a ruler to mark points 3mm from this line, all the way around the foot
- connected these points with a line drawn free-hand; first, I drew a dashed line, and then I made it solid (for some reason, this technique produces a tidier solid line than trying to draw a solid line from the outset!)
- cut out the resulting shape using paper scissors: I cut on the inside of the solid line drawn in the previous step
This gave me a shape 3mm wider all around than the sole cut-out. Next I needed to mark the positions of the stitches that would attach sole to upper. I decided to space the stitches at 8mm intervals. So I used a ruler and a pencil to mark every 8mm along the outline of the sole cut-out, starting 4mm from reference mark H, and ending up on the other side it: 80 marks altogether, each of which had to be punched out using a 00 punch!
1.3. The pattern for the upper
I had decided to make a two-part upper:
- A simple rectangular shaped counter that started at point C, wrapped around the heel, and ended up at point K
- A D-shaped vamp to cover the front of the foot; I wanted this to run from point C to point K, over the top of the foot, but not to press too hard on the instep bump (which could be painful)
I wanted the shoe to be held tight to the foot via two mechanisms:
- having the vamp fairly close fitting rather than loose
- having a lace of some sort at the top of the counter that could be tightened around the foot and fastened to the vamp
It turns out that I had just reinvented a fairly ancient pattern! Marquita Volkern’s Archaeological Footwear book shows something very similar from 16th century Germany (DD s’Hertogenbosch style).
1.3.1. Take relevant measurements of the foot, using thread
I wanted to make the pattern based on some simple foot measurements. It turns out I did have to use one piece of masking tape for this after all! I drew a straight line down a length of masking tape, then stuck the tape to the top of my foot so that the line ran from the peak of the instep bump down the inside edge of my second toe. Next, I stood carefully on my cut-out sole, making sure that my heel and toe positions coincided with the ones marked. Now I was ready to measure the following by cutting six lengths of colored thread that corresponded to the perpendicular distances to the center line from:
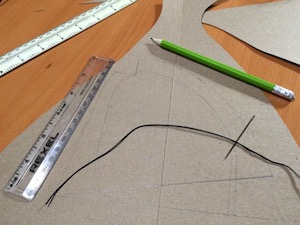
Making the vamp pattern for the fast unlasted shoe involves transferring measurements taken from the foot at various reference points. I found it was easier to do this using lengths of thread than with any kind of ruler.
- points C and K
- points B and L
- points X and Y
Next, I cut lengths of thread that corresponded to the distances along the edge of the cut sole from:
- point T to point C
- point T to point K
- point C to point H
- point K to point H
I used some final pieces of thread to measure:
- the distance from the bottom of my outside ankle bone to the ground: this gives the maximum counter height (I didn’t want a high counter to rub my ankles!): this was about 55mm
- the maximum height of the top of my big toe(nail) above the ground: this was about 18mm
- the distance down the center of the foot from the apex of the instep bump to a line connecting points C and K: this was about 25mm
I could have used a fabric measuring tape to measure all these distances, but I found it difficult to hold the tape accurately. By contrast, I could use a needle to pierce a thread at exactly relevant points.
1.3.2. Counter pattern
This was the easy part! I didn’t worry about making a curved heel shape for these shoes, as I figured a lace could be used to draw the top of the counter around the foot without shaping the back of the heel. Consequently, the counter pattern was effectively a rectangle with shaped ends and some stitching holes.
First, I drew a straight line on a piece of card, added a mark half way a long to represent point H, then measured off distances either side of this point corresponding to the distances from point C to H and H to K. I then added 12 mm to each end. This gave the line along which the stitch holes could then be marked at 8mm intervals, starting 4mm from point H and checking that the number of holes exactly matched the numbers marked on the sole between points C and K, plus an extra hole or two either end (I wanted to have the edges of the counter slightly overlapping the vamp, for strength).
Second, I drew a line parallel with and 3mm below the first, to mark the bottom edge of the counter. When I cut the pattern out, I cut along this second line.
Third, I drew a couple of lines perpendicular to the first line, and measured the maximum counter height up each of these. I knew I wanted to fasten the shoe around the foot with a lace enclosed in a tunnel of leather, so the next step was to mark where the stitching lines for this tunnel would be. I wanted the tunnel to be 1cm tall, in order to take the lace easily, so the top stitching line had to be 10mm further up from the maximum counter height, and the bottom stitching line had to be 10mm down from it. Thus, when the leather was folded to make the stitching lines coincide, the counter would be the maximum counter height tall. Finally, I needed to add a small margin of 3mm above the top stitching line (so the stitches would sit in 3mm from the edge). I cut along this latter line to get the top edge of the counter pattern.
Fourth, I needed to shape the ends of the counter. I wanted the ends of the counter to sit under the vamp at all times, and the lace to come out of the vamp in two holes roughly coincident with the foot’s center line. However, If I made the counter ends straight, one of two things could happen:
The pattern for the uppers, and the leather pieces made from them.
- If the top of the counter was the same length as the bottom of the counter, its ends would overlap at the center of the foot, so the lace would not work properly.
- If the top of the counter was shorter than the bottom, there was a danger that a gap would sometimes show between counter and vamp, especially when the foot moved.
Therefore, I had to make the top of the counter slightly shorter than the bottom, but not too short, and I needed to make the ends bulge out somewhat so that the foot would remain completely covered even when it flexed. To find out how long the top of the counter should be, I held a piece of thread around my foot approximately where I thought the top of the counter should sit. I put a needle through the thread at the back of my heel. Using this thread, I could then work out roughly how long the counter should be on either side of the center of the heel (point H, marked above). As expected, the inside length of the counter was slightly shorter than the outside length. Having measured these respective distances, I then freeform drew a slight bulge out from the bottom edge of the counter to the lower lace stitching line on either side of the counter. Since the edges would always be hidden under the vamp, I didn’t bother making the shape of the inside edge match the shape of the outside edge too closely.
The last step was to mark the stitching holes for the tunnel that would hold the lace at the top of the counter. Starting 4mm from the outside edge of the lower lace stitching line, I marked stitch positions every 8mm until I got to the inside edge. I then marked the same positions on the upper stitching line.
All that was left was to punch out all the holes and the counter pattern was finished!
1.3.3. Vamp pattern
The most complicated thing about making a pattern is how to get a 2D object like a piece of leather to drape correctly in 3D around a foot. Getting measurements wrong by as little as a millimeter or two can make the difference between a great fit and a terrible one. Throughout the process of pattern- making I kept trying to visualize what the pattern needed to do. This really helped when trying to make the vamp pattern from some simple measurements.
In this shoe, the D-shaped vamp covers the forefoot to the mid foot, and is attached to the counter (that runs from the inner mid foot, around the heel, and back to the outer mid foot) with an elastic lace.
First, I traced around the cut-out sole onto the center of a big piece of card, and transferred all the reference points to it, including the position of the instep bump.
Next, I drew a straight line between the instep bump position and point S. I also drew perpendicular lines to this line from points X, Y, B, L, C and K.
I had decided that I would make the steep 3D shape of the toe by cutting and bending the fabric, so I drew a line from point T parallel to the line up the center of the foot from the instep bump to point S, and cut the card along this line. I then measured an approximate 60degree angle towards the inside of the foot from the line of the cut.
In making the vamp pattern, I needed to draw a stitching line with holes that corresponded exactly to holes on the stitching line on the sole. The 2D vamp needs to be a shape that bends to match the 3D shape of the foot: the stitching line marked on the vamp should pass through points corresponding to X, Y, B, L, C and K on the sole. To cut a long story short, by laying out the threads I had cut in the previous step, starting 18mm out from point T along the line of the cut (18mm is the depth of the big toe measured above), I was able to mark the approximate position of the stitching line for the vamp. I then pencilled it freehand onto the card, and marked on the stitching holes at 8mm intervals starting 4mm from point T in either direction. As with the counter, I carefully checked that the number of stitching holes on each half of the vamp (either side of the lines from the vamp edge down to point T) corresponded with the number on the relevant part of the sole. The last step was to add a 3mm margin, as I had done for the sole.
I wanted the edge of the vamp that lies over the top of the foot to have a nice shape that covered the edge of the counter even when the foot flexed. I also wanted the laces of the counter to pass through the vamp to fasten at the front of the foot. I didn’t want the shoe to press hard on the instep bump. To achieve this, I drew a line connecting points C and K on the pattern, and one parallel to it to across the apex of the instep bump. I then freehand drew some curves from this second line down to points C and K to form the edges of the vamp.
For the holes where the laces needed to emerge, I punched a 5mm hole just to the outside of the foot center line (from the instep bump apex to point S), where it intersected the line between points C and K. I then punched a second hole along the CK line about 12mm to the outside of the first.
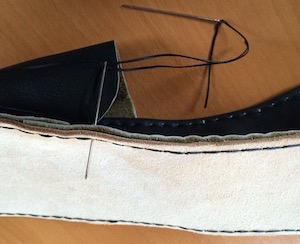
Using two needles and a single thread to stitch the upper down to the sole.
2. Cloth prototype
Before making the shoe in leather, I made a cloth prototype with a cardboard sole. This let me check and adjust the curves where the vamp met the counter, as well as the overall fit of the shoe.
3. Leather shoe
Having checked the pattern in cloth, it was time to make the real thing using leather, double stitching all seams using the two-needle technique. I used 6oz vegetable-tanned cowhide for the sole and 4oz chrome-dyed buffalo hide for the upper.
It was quick work to draw the pattern on the leather using a silver pen, cut it out using decent fabric scissors and to pre-punch all the stitching holes. I used a 00 punch, which gave a hole big enough to pull needles through without having to resort to pliers, but small enough that two 1mm threads completely filled it.
First I sewed the tunnel for the lace in the counter. I lay the lace along the inside of the leather, folded the leather over it so that the stitching holes aligned, used bulldog clips to hold things in place, and started sewing. I also tried it without the bulldog clips: it went a bit more slowly but was perfectly feasible.
Next, I sewed the counter to the sole, starting at point H and working around the outside of the foot. When I reached point K, I placed the vamp onto the sole (and over the edge of the counter), and continued sewing. The stitching went very fast, because the seam was totally accessible, and all the stitching holes lined up well. The edges of the upper and the sole are aligned, and the stitches are visible on both the upper and the sole.
When I got to the toe area, I folded the leather to make a 3D toe shape, punched an extra hole on the edge of the inside flap that folded underneath the outside of the shoe and kept sewing around to just before point C.
Finally, I started a second set of thread, sewing along the inside of the shoe from point H to point C. I tucked the counter under the vamp at point C, sewed a few more stitches towards the toe. I oversewed these last few stitches with thread from the toe towards the heel (see photo above), before tying everything off securely.

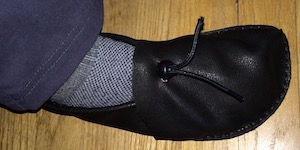
My first ever fast unlasted shoe! Here, I tried an elastic lace with bobble fastener at the front of the foot. However, the bobble keeps slipping, so for my spouse’s shoes I changed to a conventional lace (see photo at top of post)
4. Rubber sole
Since I wanted to wear these shoes outside at times, the last step was to add rubber soles. I used Vibram Elvis soles.
I cut the sole blanks slightly larger than the sole pattern, then used barge cement to attach them to the underside of the leather shoe sole. It took about half an hour to glue on the soles. I left them to cure for 24 hours (with bulldog clips holding everything firmly clamped together), before trimming off the excess rubber with a scalpel. To avoid cutting my hands, I went slowly, so this last trimming step took me out an hour and a half for the pair.
5. The end product: so successful I made it twice
I made a pair of these shoes for myself to wear as winter slippers. I was so enthusiastic about how comfortable they felt that my spouse asked for a pair. So I was able to test the method using a second pair of feet! My spouse’s feet are totally different to mine: very narrow rather than wide, no prominent instep bump, low arches, and feet half a size different rather than being roughly the same size.
It was a good thing I made a cloth prototype, because I had only measured one foot when making the pattern: the cloth prototype did not fit well on one foot, so I had to measure the second foot and adjust the pattern accordingly.
6. What did a pair of shoes cost to make?
Timewise, it took me about 6 hours to complete the pattern for a pair of these shoes and about 4 hours to cut out and sew both shoes. Gluing on, and then trimming the Vibram soles added on another few hours. So all in all, I was able to finish a pair in about 12 hours spread over a couple of days (the glue takes 24 hours to dry).
The materials cost me about 10 dollars for the leather, 15 for the vibram soles and 7 for the barge cement. Add in the costs of card and thread, and it would be difficult to get change out of 40 bucks. If you didn’t already have larger pieces of leather on hand from which to cut soles and uppers, leather costs could be a lot more than 10 dollars: I had bought half hides, and only used a bit of each for these shoes.
I already had all the tools on hand, but if I was buying them from scratch, I would expect to spend 100-120 dollars or so. At a minimum, the tools I needed were:
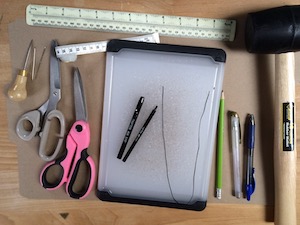
The minimal toolset for making fast unlasted stitchdown shoes.
- Pencil, ink pen and silver pen
- Card (I use card made from recycled paper)
- Plastic ruler, fabric tape measure
- Thread for measuring
- 00 punch for stitching holes, larger punch for lace holes, and rubber mallet for hitting punch
- Chopping board to save punching holes into the work bench: I find a plastic kitchen chopping board works fine for this
- Awl for marking positions of reference holes into card patterns, etc
- Paper scissors and fabric scissors
The fabric scissors are used for cutting cloth and leather, and they can also be used for cutting the rubber sole at a pinch. However, I worried that the rubber would quickly blunt my fabric scissors, so used a craft knife with a scalpel blade to trim the excess rubber off my soles. (I have since bought a lip knife, which also works well for this).
Therefore, altogether, a pair of my fast unlasted stitchdown shoes cost around $160, plus around 12 hours of my time.
However, a set of tools can be used to make more than one pair of shoes, as can a pattern. Therefore, future pairs made using the same tools and pattern will cost considerably less than $160, say $50 for materials and 4 hours of time.
I think this is worth it for a custom pair of shoes that fits beautifully and can be repaired by you if stitching or soles start to come apart!
My spouse wears his pair as house shoes: so far they have lasted over five years without needing any repair.