Methods
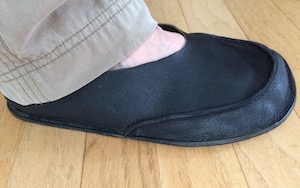
A slipper made by stitching the upper down around the perimeter of the sole.
When you start making your own footwear, one of the first things you need to work out is how you're going to to attach the part of the footwear that goes over the top of the foot (the upper), to the part that goes underneath (the sole).
The method you choose needs to be reflected in the pattern. For me, pattern-making is by far the most difficult part of making my own footwear.
Lasts, or no lasts?
Your foot is 3-dimensional, but leather and cloth are 2-dimensional. How can we get a nicely fitting 3- dimensional shoe from 2-dimensional fabric? One common method is to use a last: a wooden, resin or plastic form in the shape of a foot. The last is used to design the pattern, and the shoe is assembled around it.
If you want to make foot-shaped shoes with roomy toes and without any heels, you may find that it takes a fair amount of time and money to find a last that reflects the shape you want. Most lasts have tapering toes and are shaped to allow a particular height of raised heel. Unlike feet, some lasts are fairly symmetrical around a line drawn from heel to toe, through the center of the foot. You can imagine how much footwear made on such lasts will deform feet!
When I started making my own shoes, I did not know if I would actually end up with footwear I would want to wear. So I did not want to invest a lot of money into equipment, such as lasts, that I might only use a few times. Therefore, I made my first three pairs without lasts.
Making shoes, boots and sandals without lasts
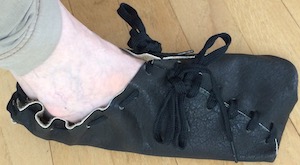
My attempt at making a bronze-age shoe from a single piece of bison leather, that sits under the foot and wraps up over it, being attached with laces. No lasts needed for this method!
You do not need a last to make footwear. You can use your own feet to make the pattern. And you can stitch the pieces together freehand without nailing them to a last.
I have tried a few techniques for making footwear without lasts:
- Wrap up. This is a very ancient method, used thousands of years ago. The upper and the sole are both made from the same piece of leather: it sits under the foot, and is wrapped up over it (see photo, right). In a way, this is like a moccasin, except much more leather wraps up the sides of the feet. The leather may be sewn together to make a 3 dimensional shape, say at the heel. And/or it could be fastened together with lace(s) that can be loosened or tightened as necessary. I have only experimented with this technique, not actually making anything that I wear in public.
- Moccasins: This is perhaps the easiest technique for beginners. The sole is made several mm larger than the outline of the foot. The upper is made to not quite reach the floor when draped over the foot. The sole is bent upwards at the edges, and stitched to the outside (or inside) of the upper; this often gives it a slightly frilly appearance, especially at toe and heel. I made several pairs in this lastless but long-lasting moccasin style before trying other techniques.
- Stitch-down or sew-down. The sole is made just a few mm larger than the outline of the foot. The upper is made a few mm longer than with the moccasin style, such that it not only reaches the floor when draped over the foot, but extends sideways a bit on the floor. The upper is stitched down through the sole: the stitching line connecting upper and sole is the point at which the upper curves upwards to cover the foot. Note that this type of shoe can also be made on a last, although I have always made them without (e.g. see my stitch-down/sew-down fast unlasted shoes). For me, this method is orders of magnitude faster than using a last and welts (below).
For all these techniques, patterns can be designed on a masking-tape or duct-tape cast of an actual foot. And for some limited types of footwear may sometimes be possible to draw a pattern freehand, based simply on measurements of the foot, and a tracing around the sole.

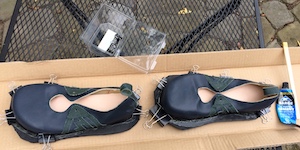
An oxford-style shoe I made on a wooden last. In this photo, I've sewn the black double welt through the upper to the midsole, then clamped the free edge of the welt to the veg-tan outsole, ready to start stitching. I'm holding the shoe by the top of the last.
Using lasts and welts to make footwear
A last is a stand-in for a foot. It is usually made from wood or resin, or another material that can have metal nails banged into it without breaking.
The last is used to design the pattern. The shoe is also assembled around the last, by nailing on first a sole, then the upper. The upper is sewn or glued to the sole, or both glued and sewn.
The only times I have used glue to assemble critical parts of a shoe, other than the rubber sole (below), has been on two shoe-making courses. Glues that are strong enough to hold the various layers of leather together when the foot is in motion are all solvent-based. I absolutely hate the smell, not to mention the thought of how neurotoxic the glue might be.
Therefore, when making shoes myself, I have always used stitching rather than glue to attach uppers to soles; when making shoes on a last, I have mostly used welts.
I taught myself how to make both double welts and single welts, from photos in books. I actually invented my own kind of single welt; this is the technique I have used in most of my lasted shoes.
Making a pair of welted shoes on lasts takes a huge amount of time, and a substantial investment in tools. I have found it can take 40+ hours to make and prototype a pattern, and at least as much time again to construct the actual shoe. The end result looks extremely professional and, if the lasts and pattern are good, fits like a glove.
Adding a rubber sacrificial sole
The stinkiest stage of shoemaking, best done outside: using glue to attach a rubber sacrificial sole. Once the glue has dried, the rubber is trimmed to match the leather above.
Whether or not you use a last, you end up with footwear that has a leather (or perhaps stiff fabric) sole. If you wear it outside, on concrete or tarmac, it wears down very quickly. Therefore, you probably want to put some kind of rubber material onto it unless you only want to use it as a slipper or indoor shoe. When you wear it, this sacrificial material is worn down, not your carefully-sewn leather.
Depending on the type of rubber sole you want to use, there are two main ways of attaching it:
- By stitching it on: stitch through the leather sole and through the rubber sole. I find this only really works with thin, soft soling material, such as crepe, and the resulting sacrificial soles wear through very quickly.
- Using glue: this is the method needed for most soling material, such as Vibram soles. The type of glue required depends on the soling material, but is almost always solvent-based. Since I don't have a fume cupboard, I always apply the glue outside, and leave it to set for 24hr in a well-ventilated garage.
This is the step I hate most about shoemaking! Not only are there the fumes from the glue to avoid, trimming the rubber material after glueing it can be tricky, even with a very sharp knife.
Sometimes I ask my local cobbler to attach the Vibram sole rather than doing it myself, as he has machines that help trim and sand the edges after gluing. The cobbler can also be a great source for buying soling material such as sheets of Vibram soling material (note: buying online can give you material that is not what it purports to be; a good cobbler will have a genuine source).
Repairing and modifying
An advantage of making your own footwear is that you may be able modify it slightly later on, if you want. For example, I modified some court shoes several years after first making them, because they had stretched over time.
You can also redo the rubber soling yourself if it wears down. I have re-soled some of my shoes four or more times: I put a lot of wear onto them walking my dogs!