Moccasins: lastless but long-lasting
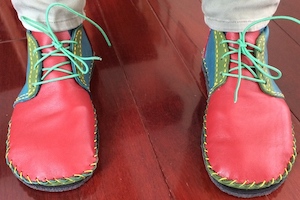
My first ever pair: made in 2 days. I have modified this pair since this photo was taken: see the bottom of this page for details.
I made my first pair of shoes using a method I learned from Sharon Raymond of Simple Shoemaking, on a 2-day course I took with her. What I describe below is somewhat modified from the method Sharon taught me.
These moccasin-style shoes are made without lasts, and the pattern-making method is a variant of what I have described as Method 2 in my pattern-making summary.
Step 1: make the pattern
As with all footwear, whether made on a last or not, the first step is to identify what pattern to use, and if it doesn't already exist, to make it.
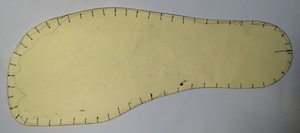
Base sole pattern. Note that the toe area contains roughly a finger’s width of space beyond the actual ends of the toes (which are shown by the wiggly pencil line), to allow the toes room to move when doing something other than standing or sitting. The black marks show stitch positions.
Sole patterns: base and frill
Stand on a piece of card, and draw carefully around the foot with a pencil, keeping the pencil roughly perpendicular to the card. The shape of the tracing reflects the shape of the foot's sole.
When you walk, run, skip, jump or otherwise move on your feet, your joints flex and your foot changes shape. This is one of the things that makes shoe design so challenging. It’s very important to leave room at the end of the shoe for the toes to move forwards slightly.
Therefore, the next step is to mark roughly a finger’s width away from the end of each toe. Then draw a line freehand connecting the marks: this delimits the eventual end of the shoe. Also connect the outside of the little toe joint to the heel with a single smooth line that smooths the somewhat wiggly line on the foot tracing. This gives the pattern for the base sole.
Finally, make a pattern for what I call the frill sole. This is a piece of leather that is sewn onto the base sole but is slightly larger, so that it can curve upwards to overlap the upper (see next photo). Since it is slightly larger than the upper, it puckers a little when pulled tight to the upper, especially at toe and heel. Hence "frill".
This photo shows how the "frill sole" is pulled upwards around the outside edge of the upper. It could also be pulled up inside the upper, which looks a bit neater (see lowest photo on this page).
Basically, the frill sole is the same shape as the base sole, but 6mm wider all around.
Pattern for the upper
Now for the fun bit! Put on a thin old stocking or completely wrap the foot in cling film to above the ankle.
Use duct tape to make a little parapet around the toe area of the base sole, perpendicular to the sole and about as high as the toes.
Then use a piece of duct tape to attach the cardboard base sole pattern to the bottom of the foot so that the foot and the sole line up exactly, before duct taping the foot to the card, and continuing to encase the foot in duct tape up to the ankle.
Once the foot is covered encased in duct tape, cut the tape off carefully, starting behind the ankle and cutting down towards the base sole. When the foot is out, retape the cut edges carefully, so that the edges meet exactly. You end up with a 3D duct-tape cast of the foot.
Making a duct-tape parapet around the toes, before duct-taping the entire foot can help ensure the finished footwear has enough vertical room for the toes.
Now it's time to draw a pattern on the resulting cast, making sure that no seams would impinge on troublesome parts of the foot, such as big toe joints. Also, mark a clear line down the center of the foot.
Finally, I use a card template to measure a series of marks along the seam where my foot hit the basal card. These indicate stitch positions (see below). It is important to ensure that both the upper and the card forming the base sole are marked with pen at each stitch position.
I then employ a scalpel to cut the duct tape from the basal card, and scissors to cut out the various parts of the pattern.
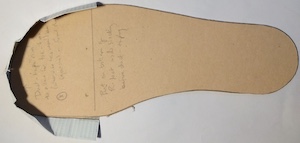
Next, I flatten the cut out pieces of duct tape and stick them onto thin card, before tracing out around them.
I then cut out around these shapes, and trace the cut outs onto yet more card. After adding seam allowances, this gives the basic pattern for the upper.
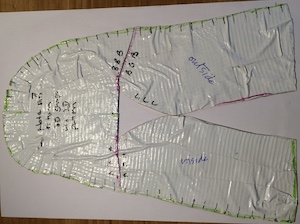
Duct-tape flattened onto card. Note slits cut into toe area, to allow flattening.
An aside on stitch spacing
Stitch spacing is a matter of preference. To attach uppers to soles, I like 8mm, although I have also used 10mm and 6mm spacings in various pairs. I like to start marking stitch positions at the center back of the heel.
The critical thing is to have the same number of stitch positions on the upper and the frill sole. So the same number of stitches marked on the upper need to be marked onto the frill sole pattern.
The easiest way to do this is to place the base sole pattern onto the frill sole pattern (so that there is the same margin all the way around), then simply transfer the stitch positions from the base sole to the frill sole.
It's always worth double checking that there are exactly the same number of marks on the upper as on the frill sole!
Once stitch positions are marked on the sole pattern pieces, draw a line 3mm in from the outer edge, then use a 00 punch to knock a tiny hole through the leather where each stitch mark intersects the line.
Shoe assembly: attaching upper to sole
First, all pattern pieces (including positions of stitching holes, as noted above) have to be traced onto whatever material will be used in the final footwear using a silver pen, and cut out along the insides of the tracing lines.
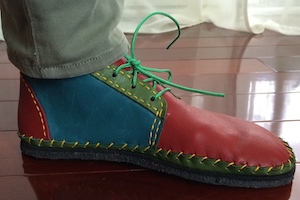
Here, large yellow whip stitches secure the dark green frill sole (pulled upwards from the black crepe base sole) to the red and blue upper.
- Base sole: soling material (crepe for my first two pairs, 6oz veg-tan leather for my third).
- Frill sole: 3-5oz leather.
- Upper: 3-5oz leather.
Then, stitching holes need to be punched, before the various pieces are stitched together in the following order:
- Assemble the entire upper.
- Stitch the base sole to the frill sole, ~2mm from the edge of the base sole
- Stitch the upper to the frill sole. As it can be tricky to get one's hands all the way inside the toe area, I found it easiest to start the stitching at the front of the instep, continue around the toe, down the outside of the foot, around the heel, and back up the inside.
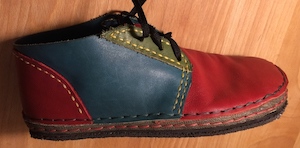
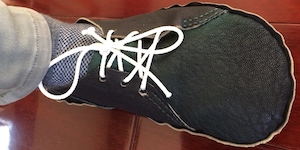
The same boot as in the previous photo, with an extra strip I added between upper and frill sole, to accommodate the changing shape of my foot. This (goatskin) strip comes down over the top of the frill sole, hiding it completely. Note the change in stitching from whip stitches to straight double-stitched seams. I also changed the round green laces for more practical flat black ones.
Attaching uppers to soles: whip stitch or double stitch
Sharon Raymond of Simple Shoemaking, who introduced me to this kind of method, recommended a whip stitch to connect upper to frill sole (photo, right).
However, I found that a simple double-stitched seam was more robust than a whip stitch, so I have actually removed all the whip stitching from my first two pairs of shoes and restitched everything using double-stitched seams. That is, the same kind of stitch used on the rest of the upper: a single thread with a needle on each end, so every stitching hole has the thread going through from the inside to the outside, and also from the outside to the inside.
While I was restitching, I changed the positions of the upper relative to the frill sole, so that I ended up with the uppers sewn on the outside of the frill sole rather than on the inside of it. This means that the frill sole is no longer visible (photo, left).
Comfortable and modifiable
These are not smart, formal shoes, but they are very comfortable.
Interestingly, since I made them, my feet have changed shape considerably: the big toes have moved into better alignment with the underlying joints and my arches have become higher. Therefore, I had to alter my first several pairs.
I made them slightly larger by adding an extra strip of leather between the upper and the frill sole to accommodate the change in my foot shape. Since the whip stitching between upper and frill sole was starting to fray anyway after a few months of wear, this was not much of an issue. I just removed the whip stitches, stitched the extra strip to the frill sole, and then stitched the upper to the strip. I also took the opportunity to hide the frill sole by stitching the strip on the outside of it. See the last photo on this page for what they looked like after being altered.
More on the fun of being able to modify shoes after making them.