Modifying worn shoes

After a couple of years’ occasional wear, the upper on this court shoe stretched so much that the fit became sloppy, and the heel was slipping too much.
One of the joys (to me) of making my own footwear is that the creative process does not end with the production of a wearable pair of shoes. While I’m wearing what I’ve made, I try to notice what works well, and what doesn’t.
Things that work well (like my tozafoot method single welts) get put on the inclusion list for new pairs. Things that don’t work well are put on the avoidance list. And if I’m lucky, I can bring the shoes back to my workbench to be improved.
Along these lines, I modified a pair of court flats a few years after I first made them. They were only the second pair of welted shoes I’d ever made (having taught myself how to stitch an L-shaped welt, also known as a double welt).
They were my third attempt at lined shoes: they have an upper that consists of a 2.5oz black calf-leather, lined with 2oz vegetable-tanned, undyed calfskin.
I am quite hard on shoes, often walking a mile or several at a time on hard surfaces like tarmac or concrete sidewalks. Also, when I made these shoes, I was still very new to learning about leather grain and thickness.
So perhaps it is not surprising that through a combination of hard use, and sub- optimal positioning of the pattern on the leather, these shoes stretched so much that I felt I needed to modify them somehow to keep them wearable.
The question was, what kind of modification would be (a) simple, and (b) not too unsightly?
I could immediately think of two options for adding fastening across the midstep:
- A lace
- A Mary-Jane style strap with a buckle
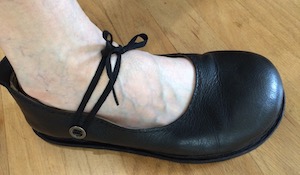
About the simplest fastening possible: a flat lace looped around each button and tied in a bow.
Since I did not know which would work best, I decided to add buttons just forward of the ankle bones, to which I could attach either laces or a strap, depending on the occasion.
To find where the buttons should be sited, I experimented with holding laces and straps against my foot, and used a silver pen to mark where I thought the best locations were. I then checked that these were underlain by the thick, vegetable-tanned heel/counter stiffener that I had put between the lining and the upper when I originally made these shoes. I needed this to be present where I was going to make the stitch holes for the thread holding on the buttons, because the upper and lining material alone would not be heavy enough to hold the stitches.
I already had some robust metal buttons in my sewing drawer. So once I had worked out where to put them, it was a simple matter to stitch each on with 1.0mm Tiger thread (three stitches each, over a distance of about 1cm).
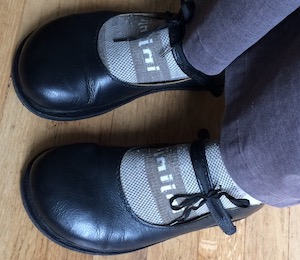
A test strap, made from a scrap of goatskin with a slit cut in each end, to slide over the buttons.
Adding laces was easy, and I had a bit of fun experimenting with lacing styles from the very simple to the more complex.
While this definitely worked well to hold the shoe on for vigorous walking, it wasn’t very formal. I wanted to see if I could add a strap to make the shoe prettier.
First, I used some spare scraps of goatskin to work out what dimensions of strap would be suitable.
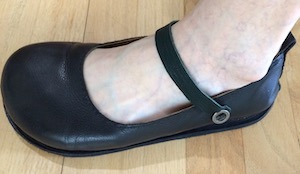
My hybrid strap-laces. The laces pass through the strap, under the buttons, and back through the strap to be tied wherever: here, I’ve tied them on the side of the foot.
Having decided on strap length and width, I decided to make the strap out of the same black calf leather as the upper, but doubled over for strength. Luckily, I had a few large enough scraps left over that I was able to cut the patterns for two straps, while ensuring that the grain ran across the straps, so that they would be less likely to stretch along their length.
While I felt the double-thickness leather would work well as a strap, I was less confident that it could cope with the point stresses inflicted by being pulled repeatedly onto a button at either end. I worried that if I were to reinforce the strap enough to hold a robust button hole, it would become too wide and stiff to be pretty. I may think of a better strap design in future, but for now, I have used the strap as a base for a lace.
That is, I have cut a slit in each end of the strap, through which to pass a loop of lace. This lace then loops under the buttons and can be pulled tight and tied on the top of the side of the foot.
I have to say that I am fairly pleased with the result. I have worn these modified shoes without them loosening or chafing at all.
But they are a little fiddly to fasten in the first place, so I may experiment with making a pair of new straps that fit directly over the buttons. Perhaps with a bell-shaped end, or maybe a colored flap to hide the button and add visual interest. There are many possibilities, and each will make my little black shoes look like a slightly different pair.
As I said at the start, I love the many opportunities for creativity that shoemaking affords! And I am always learning: my next pair of court shoes had cross-foot fastenings built-in from the start.