Grappling with pattern-making
Devising a pattern that results in a nicely-fitting shoe is, for me, the hardest thing about shoemaking.
When you think about it, this isn’t surprising. A foot is a complicated 3-dimensional object. How do you go from a flat piece of fabric like leather or cloth to something that fits closely to the foot? And that stays snuggly fitting whether you are standing, walking, running or jumping? The difference between a great fit and a terrible one can be a matter of just a millimeter or two.

Pattern for a Roman sandal designed using Method 1. The sandal (see next photo) is made out of a single piece of leather (i.e. the "wrap up" method of attaching uppers to soles), which is held to the foot by a lace. To make the sandal more robust, I also made a veg-tan outsole in the shape of the tracing made around the sole of the foot; after stitching this in place, I could then glue a rubber sacrificial sole to this.
So far, I have tried three main ways of making patterns. All take longer than I would like!
- Method 1 is quick but can only be used for a limited range of styles.
- Method 2 is my preferred method and can be used with lasts or actual feet, for all kinds of footwear.
- Method 3 is for purists using lasts, and to my mind the least suited for making shoes, boots or sandals that are shaped like actual feet rather than the idealized foot shape of the last.
Method 1: work off a tracing of the sole and key measurements of the foot
This is the simplest method I've used. It involves:
- tracing around the foot, to make the pattern for the sole(s). This is done in the same way as for Method 2 (see section 2.1 below).
- marking some key reference points on the tracing
- making several measurements of the foot in relation to these reference points
- drawing a pattern freehand, based on these measurements
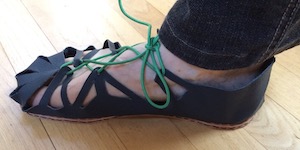
I designed the pattern for this Roman sandal using Method 1.
I described the method in some detail in a post about making a pair of unlasted stitch-down shoes, so I won’t dwell on it here. But I do want to discuss some pros and cons.
The major pro of this method is that it is faster than the other methods I’ve tried, and doesn’t require as much equipment.
However, a big con is that I don’t think I could make an intricate, close-fitting pattern using this method. It's difficult to take even a limited number of measurements on one's own foot, and even a millimeter or two here and there can make a big difference to how well a shoe fits.
Therefore, I have only tried this method with patterns that rely on laces to hold the end product tightly to the foot. For example, a Roman-style sandal (see photo, left).
Method 2: work from a tape cast
This is the method I used for designing the pattern for my first ever pairs of shoes, which used the "lomoc" moccasin technique to attach uppers to soles. I have also used it many times since for designing patterns for stitchdown unlasted shoes, as well as for patterns for shoes and boots made on a last.
The cast can be made of duct tape or masking tape. It can be made on the foot or on a last.
The main thing is that the tape should not stretch when you remove it from the foot or last, and should be easy to make marks onto using pencils and pens.
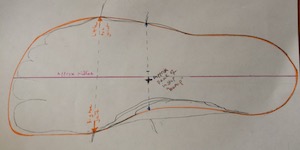
Here, my foot tracing is marked in pencil, and the sole pattern is marked in orange. Since this was to be for an open-toed sandal, I did not leave much room beyond the toes, but I did give the big toe room to the side of it.
The basic method for making a casting of an actual foot is as follows.
2.1. Make a sole pattern
Stand on a piece of card and trace around the foot with a pencil held vertically. Then trace under the arch of the foot with a pencil held at about 45 degrees under the arch. The sole pattern will be based on this tracing.
Step off the card and draw some lines in freehand:
- Under the arch of the foot. I draw a line roughly halfway between the lines marked with the pencil held vertically and with it held at an angle.
- Just inside the outside edge of the foot between the little toe joint and the heel. My foot bulges out a bit in this area when I am standing, but the bulge disappears when I point my toes. So I bring the sole edge inwards a little from the marks made when tracing around the foot.
- Around the toe area. I try to give my big toe a couple of mm to the inside of it at the end of the toe. Usually, I add about a finger’s width of space at the ends of every toe to give the foot room to move when I am walking. The exception to this is certain styles of open-toed sandals, where I might end the sole fairly close to the tracing of my toes.
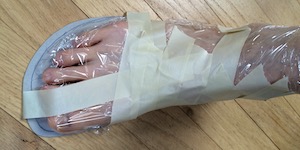
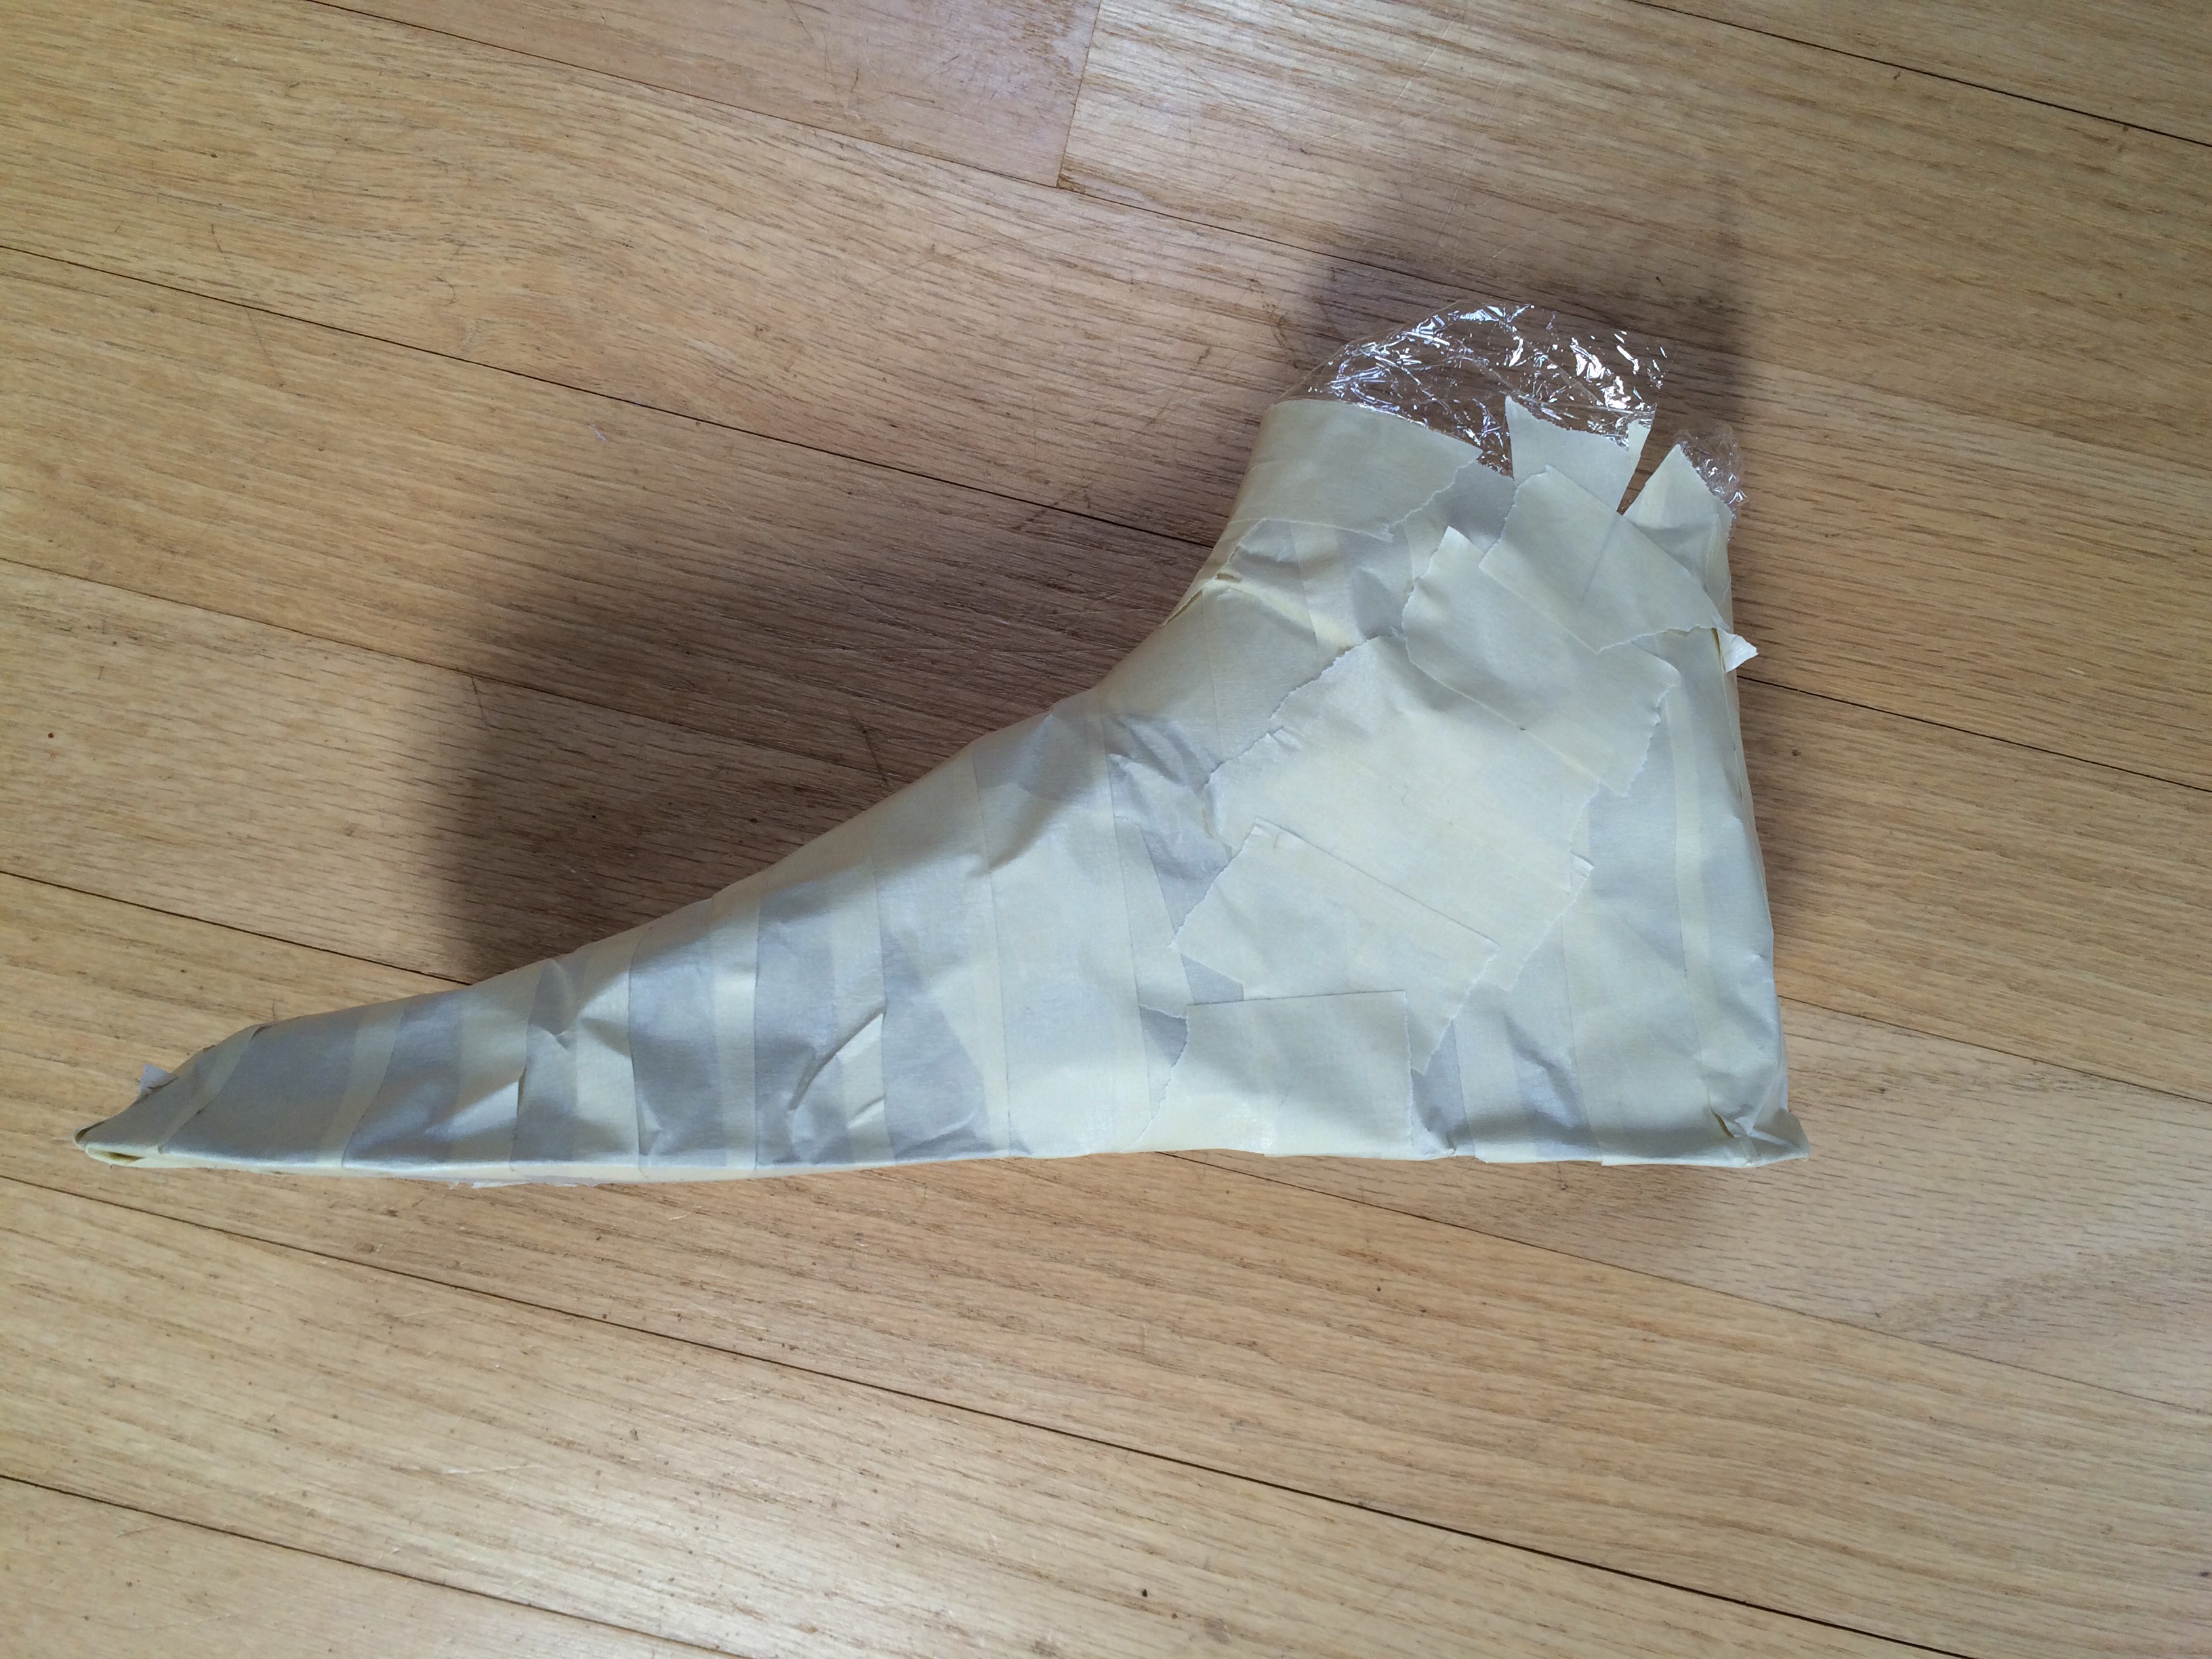
Making a rough and ready cast of the foot. Here, I was going to be making a pattern for open-toed sandals, so I did not worry about using a toe shield to help shape the cast nicely at the end of the toes.
2.2. Stand on the sole pattern and cover the foot in cling wrap, then tape
The aim here is to make a 3D cast of the foot using tape. This cast will eventually be cut up and flattened to make the pattern.
In order to get the cast off the foot easily, the foot needs to first be coated with something that will not stick to the foot but that will let the tape stick to it. This something also needs to be cheap, because it will be cut during the process of cast removal.
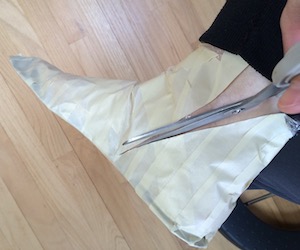
I’ve found that an angular cut almost to the sole, starting behind the inside ankle bone, is the easiest cut for getting the cast off the foot.
I’ve tried using old nylon stockings. I’ve also tried cling wrap (also known as cling film). My preference is the latter because I find that the stockings pull my toes together too much, whereas I can keep my toes spread while covering them with cling wrap.
The method here is pretty simple. I wrap my foot in cling wrap. Then stand on the sole pattern and cover the foot in tape, carefully taping around the bottom of the sole pattern.
Depending on what sort of shoe I want to end up with, I may make a little toe shield out of cardboard or duct tape to make sure the tape in the toe area doesn’t scrunch around the ends of the toes too much.
2.3. Mark up the cast and cut it off
Once the cast has been cut off, I carefully retape the cut. Here, I was going to be making a pattern for open-toed sandals, so I did not worry about using a toe shield to help shape the cast nicely at the end of the toes.
Once the foot is completely covered in tape, I mark some key points onto the tape while it is still on the foot. For example, if I am making a shoe, I might mark the area of the big toe joint, the little toe joint and the bump on the top of the foot over the instep, so I can avoid putting edges or seams over these areas. If I am making a sandal with an upper that attaches to the sole between the big toe and the second toe, I will mark that place on the tape.
Once reference points are marked, I use scissors to cut carefully down behind the ankle on the inside of the foot, at an angle, until I can pull my foot out.
Once I’ve eased off the cast, I retape the cut making sure to exactly match the ends of the tape. This leaves me with a cast onto which I can start drawing the pattern.
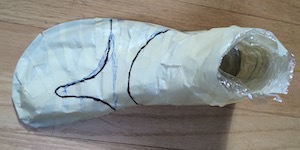
Pattern for a chappal-style sandal inked onto the foot cast. Note the blue ink cross in the toe area: I drew this on while the cast was still on my foot, to mark the bottom of the gap between my first and second toes. I also drew an ink line across the foot below the big and little toe joints. These then served as a reference points for the actual pattern.
2.4. Draw the pattern onto the tape
Now it’s time to draw the pattern onto the cast. In theory, one could do this while it was still on the foot, but I find that very difficult.
I usually draw lines using a soft pencil, so I can rub out as necessary.
Once I have the lines pencilled in, I may ink them so it’s clear where to make cuts. I may also add labels such as "inside" or "top", to make it easier to work out how all the cut-out pieces fit together.
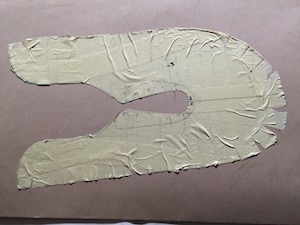
Masking tape shape flattened onto thin card. This is a pattern for a closed-toe shoe. Notice the slits at the toes and the slight distortion in the mid foot, necessitated by flattening.
2.5. Cut out the pattern and flatten it onto card
Scissors come into play again to cut the pieces of the pattern out of the cast.
I then peel the cling wrap or nylon carefully off the tape before sticking the tape onto card.
Cutting out and peeling off cling wrap is easy: much harder is flattening the 3D cut-outs onto card without introducing too much distortion.
Flattening a very concavely curved piece may mean I need to cut slits in it (for example, in the toe and heel area). If the piece is strongly convexly curved (e.g. from the arch area), I may need to accept some wrinkles in the flattened piece.
Once the patterns are stuck down to card, I cut out the pieces, then trace around these onto new card. From here, I can add seam allowances as required. This is also the stage at which I check carefully that all seam lengths match each other, and adjust as required. Now I have a pattern that I can use to prototype my new shoe.
2.6. Use the same basic process for making patterns from lasts
Above, I outlined the process for making patterns from a tape cast of the actual foot. One can use essentially the same method for making patterns from a last:
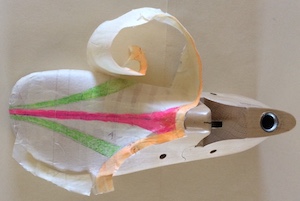
Using method 2 of pattern-making with a last. Here, I'm peeling the tape off the last, so I can stick it to card.
- To obtain the pattern for the insole, draw around the base of the last onto thin card
- Cut out this insole pattern, and stick it to the sole of the last with hoops of masking tape
- Cover the rest of the last with masking tape (overlapping the tape onto the sole the whole way around the foot)
- Draw the design onto the masking tape using pencil and/or pen
- Use a scalpel to cut along the lines that will become seams in the final piece of footwear, and peel the resulting shapes carefully off the last
- Stick each peeled-off shape to thin card, trying to introduce as little distortion as possible (this may require small slits to be cut into the edges of the shape)
- Create the pattern from these flattened pieces, taking particular care to match the lengths of seams, and to add lasting margins as necessary (usually 20mm for a handmade leather shoe).
Method 3: posh lasted shoe patterns
The third method of pattern making was taught to me by a professional shoemaker. Essentially, it involves the following steps:
- Tape up a last with masking tape and mark key reference points, then draw a pattern onto the tape in pencil, as in method 2.6 above
- Unlike in Method 2, the tape is removed from the last in two halves: cut down the center line of the front and the back of the heel to divide the taped pattern into an inside half and outside half
- Peel off the two halves and stick each to card; from these, create an Inside Forme [sic] and an Outside Forme [sic], which are then superposed to create an Average Forme [sic]
- Create pattern pieces based on the averaging of the inside and outside shapes. If a pattern piece crosses the center-line of the foot, as it might at the toe (the vamp) and heel (the counter), complicated algorithmic adjustments need to be made to the shapes (e.g. so-called "vamp deadening").
All in all, I found the process very lengthy and intricate. Also, because my last was highly asymmetrical with a steep toe area, there were fairly substantial differences between inside and outside formes. So it was particularly stressful to make the average forme and do the various algorithmic corrections to the vamp and heel patterns.
This method seemed to me to be designed to make patterns for lasts that are symmetrical around a line drawn from the center of the heel to the center of a tapering toe area. That is precisely NOT the sort of footwear I want to make. So I have not used this method apart from on the course where I was taught it.
When using lasts, I prefer method 2 to method 3
I find Method 2 works well for footwear that reflects the highly asymmetrical shape of the foot. For example, I used it to make the pattern for my side-fastening shoes with trompe l'oeil toes.