Court shoes
The previous court shoe I'd made stretched with wear, to the extent it needed modifying. This shoe has a double welt.
After three years shoemaking, I’d made myself many pairs. My skills had improved massively, and I had acquired some decent tools. It was time to attempt a slightly more formal pair.
I had already made some court shoes: a little black pair. However, this was only the second pair of welted shoes I’d ever made, so the stitching wasn’t especially neat; also, I felt that the L-shaped double welt was a little chunky for truly formal wear. What’s more, I was still at an early stage of learning about leather grain and bias when I made that pair, which have stretched noticeably since I made them, to the extent I needed to modify them.
Given this experience, I realized I needed to:
- Use a more slimline welt
- Have some method of attaching the shoes more tightly at the midfoot, so even if the leather did stretch a little, they wouldn’t slip off.
The process: same as for other lasted and single-welted pairs
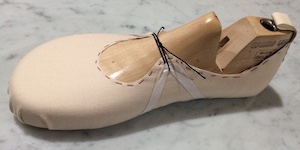
Prototyping using cloth, cardboard and masking tape.
First, make a pattern, and prototype it in cloth
As these shoes would have welts to attach uppers to soles, I made them on a last. I also created the pattern on the last, before testing it in a cloth prototype.
Purists would probably be appalled, but I don’t bother nailing my cloth prototypes to the last. I just use masking tape to hold them in place firmly enough to check the fit, especially around the top of the foot, and also how easy it is to remove the shoe from the last.
Once I had the cloth prototype attached to the last, I experimented with different types of mechanism for lacing the shoe over the midfoot.
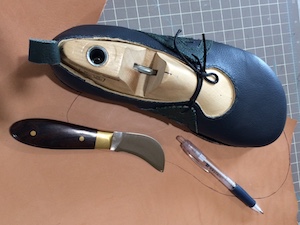
Rather than putting the lace through the upper itself, I decided to sew on a separate piece of leather that would not only contain a hole for the lace but which would also be decorative.

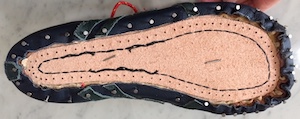
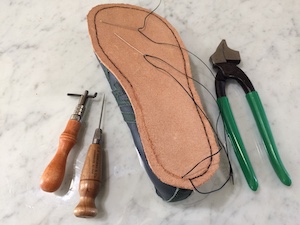
My sole and welt patterns, all in a single piece of card.
Experimenting with making patterns for insole, midsole and welt
For previous pairs, I cut out lots of separate pieces of stiff card to make the patterns for the insole, mid sole, outsole etc. Here, I experimented with making all the patterns out of a single piece of card (see photo).
I used a scalpel to cut out the lines marking the edges and stitching lines for the various sole pieces.
Once I'd cut everything out, I used a 00 punch to mark the many stitching holes.
Timewise, making this composite pattern was about the same as cutting out lots of separate pieces, but it required more concentration, so I am not sure it was worth it, other than the slight savings in card.
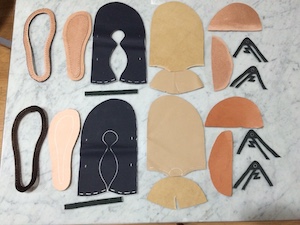
Altogether, 36 pieces of leather went into this pair of shoes. Here are most of them, including the welts (left), uppers and liners (center), stiffeners for toes and heels (right), and the decorative pieces to hold the laces (next to stiffeners). Not shown are the outsoles, or the pieces used to fill in the mid sole.
Cut out the leather, and dye / skive / soak it where appropriate
Once I was satisfied with the patterns for upper, liner and soles, I needed to use them to make the various pieces in leather.
As always when shoemaking, it's important to work out how you want the leather's grain to work with your pattern. Which direction do you want stretch? Where do you definitely not want stretch? This needs to be taken into account when laying out the pattern pieces on the leather hides.
Once I have decided where, and in what orientation to place the pattern piece, I use a small anvil to weight it down while I draw around it with a pen. I have used both silver pen and fine ink, to mark the pattern pieces. The advantage of the silver pen is that the marks can be erased later. Ink markings are much harder to get rid of. But ink pens are cheaper!
Before removing the pattern from the leather, it's important to use the pen to mark not only the pattern edges but also any stitching lines or holes marked in the pattern.
Cutting out can be done with a scalpel, knife, or scissors. Whatever method is used, the cuts should be perpendicular to the leather surface, and on the inner edges of the silver or biro lines.
Once cut out, some pieces will have to be skived in certain places: annotations on the pattern should make clear which these are.
This is also the time to dye the top sides of the welts, because it's impossible to dye them cleanly once they have been attached.
Also, as I was using veg-tan stiffeners at toe and heel, I needed to put them to soak in water about twelve hours before attaching them to the last.
Nail the shoe to the last
I pre-punched welt-stitching holes in the mid sole before sewing it to the insole, then nailed the combined unit to the bottom of the last.
First, I sewed the pieces of the upper together. Next, I sewed the pieces of the lining together. Then, I sewed upper to lining, and trimmed the upper edges.
Once uppers and linings were three-dimensional and ready to attach to the last, I stitched the insoles to their respective mid soles, so that a two-layer combined sole was ready to nail onto the last, insole innermost.
Nailing the sole onto the last is easy. Nailing on the combined upper, liners and stiffeners less so, particularly in the highly curved regions that comprise the heels and toe areas. Narrow lasting pliers are a necessity.
Before putting the upper onto the last, the soaked stiffeners need to be inserted into the relevant places at toe and heel. I use hirschkleber glue on both sides of the stiffener to help hold it in place while the whole thing is being pulled around onto the last.
To nail on the upper is a process that requires strength and good eyesight. First the heel is pulled over, and a nail inserted into it to secure it to the insole at the center back. Then the toe area pulled forward, and a nail hammered in to hold the toe area on. Once these nails are firmly in, the next step is to secure the upper with nails either side of the ball of the foot. Once these four nails are all in the fit of the shoe on the last needs to be closely inspected to make sure it is straight on the last, and that the leather is unwrinkled.
I pulled the upper, liner and stiffeners over the last and nailed them on. Then I trimmed their edges, so that they almost but not quite meet the midsole. This shoe is ready to have the welt attached.
If all looks fine, the process of pulling over the upper, lining, and stiffeners, and nailing them on can continue until the entire perimeter has nails every centimeter or two. At toe and heel, the leather may need to be pushed and hammered in some places so that no wrinkles extend up the sides of the last from the inevitable wrinkled areas that develop on the sole.
Trim ready for welting
Before the welt can be attached, some of the leather from the upper, lining, and stiffeners that has been pulled under the last needs to be removed. If it were left in place, it would bunch up under the midsole: not only would this look untidy, it would make the shoe unwearably lumpy underfoot.
So, very carefully, I used a scalpel to cut off the free edges of the upper, lining and stiffener until they only reached the edge of the midsole (see photo).
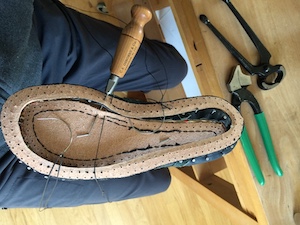
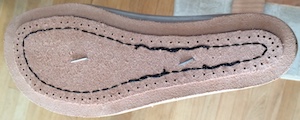
The tozafoot method of single welting. In this particular pair I had pre-punched the welting holes in the midsole. But that's not necessary: an awl can be used to make these at the time of stitching too.
Time to attach the welt
By the time I made these shoes, I had invented and practiced my own method of welting.
Rather than bending a straight strip of leather around the shoe as traditional shoemakers do, I cut out a piece in the final shape I want (the center of this cut-out became the midsole). This continuous, flat ring of leather in the shape of the sole is then stitched to the midsole, through the combined upper, lining and (as relevant) stiffeners.
Strong thread is a must: I use 1.0mm Tiger (Ritza) thread.
I use a straight awl to punch holes through the upper, lining and stiffener, and curved needles to pull the thread through these holes and the corresponding holes in the welt and midsole.
I punched stitching holes in the welt before dying and attaching it. This meant it was easy to space the holes evenly (I like an 8mm spacing).
It's also possible to pre-punch holes in the midsole, as I did here. But it's equally possible to use the awl to make these midsole holes as one sews. Making the holes as you go is actually a bit easier in the areas of heel and toe, because it's easier to get the holes in the upper, stiffeners, liner and midsole all lined up for the needles to pass through.
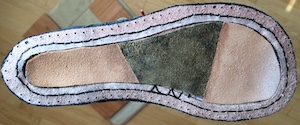
The area inside the welt has been made level using goatskin pieces. In this photo, you can clearly see the inner edge of the welt has been skived (before starting to attach it), from the stitching line to the inner edge. This helps the welt lie flat over the upper, lining and stiffener that are pulled under it. Hammering also helps everything to lie flat: another advantage to making footwear on a last.
As always, I start stitching on the inside of the instep, and work around the toe, down the outside of the foot, around the heel, and back to the instep. The nails are removed with pliers, just ahead of where the awl is used to make the next hole.
Level off the area inside the welt
Once the welt has been sewn on, it can be attached to an outsole that will eventually be glued to a rubber sole. But before that can be done, the area inside the welt needs to be made level. Some leveling can be done by hammering, but it may also be necessary to insert one or two thin pieces of scrap leather, cut and skived to shape, to evenly fill the areaover the midsole, between the inner edges of the welt.
I like to use goatskin to fill this area, as it is nice and spongy. I use water-based glue (e.g. EcoWeld from Tandy Leather) to hold it in place.
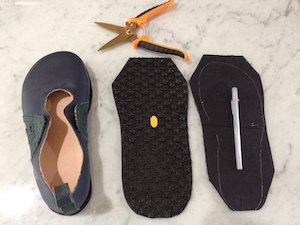
Drawing the shape of the outsole based on the welted shoe shape. Note that here, the welt has been attached (previous photos) but is barely visible when the shoe is seen from above, as here.
Make, and attach, the outsole
I didn’t bother making a card pattern for the outsole, because it was easy enough to place the partly constructed shoe onto a piece of leather and trace around the perimeter of the welt. The outsole leather is so thick that it can’t be cut with scissors: I had to use a very sharp knife.
Once the outsoles were cut out, I could remove the shoes from the lasts before sewing them onto the outsoles via the welts.
Sewing the outsole to the welt involved several steps.
- Clamp the outsole onto the welt using bulldog clips
- Use an awl to punch stitching holes through the outsole to match the holes in the overlying welt (I’d already punched holes in the welt before attaching it).
- Carve a groove into the bottom of the outsole connecting all the holes: stitches will lie in this groove. Not only does it mean that it's easier then to attach a rubber outsole (because it doesn't have to cover protruding thread), it also means that resoling is less likely to cut any stitches by accident.
- Stitch on the top of the welt the outsole to the welt, using pliers to pull the needles through. Once again, I used strong thread for this: 1.0mm Tiger (Ritza) thread.
The outsole stitched to the welt, plus the relevant tools including (from left to right) groover, awl and pliers.
Unlike the stitches holding the upper to the midsole through the inside edge of the welt, these stitches will be visible. But only just visible under the curve of the shoe. I used black thread, and had dyed the welt black, so they are really hard to see unless one looks closely.
Once the outsole has been sewn on, it and the welt can be trimmed back to ~2mm of the stitch line using a very sharp (lip) knife.
The trimmed edges can then be carefully dyed to match the color of the top of the welt.
Purists might also want to sand the the outsole and welt edges to a shiny finish. However, I am not too bothered about having a shine on the edges of my soles, and I value my lungs. Therefore, while I do a small amount of hand sanding using 220 grit sandpaper before dying, I do not sand much.
It's almost impossible to exactly line up the rubber sole with the shoe while gluing (everything is so sticky!), so I cut the rubber slightly larger than the outsole and trim it back once the glue has dried. While the glue is drying, I use bulldog clamps to keep the rubber firmly in place against the leather outsole.
The last step: adding a rubber sacrificial sole
This is the step I truly hate: using barge cement to attach Vibram rubber soling material to the leather outsoles. The fumes from the adhesive are very stinky, so I work outside.
First, I cut pieces of Vibram material in approximately the same shape as the outsole, but several mm larger all around.
Then, I roughened the surfaces of the Vibram material and the outsole leather, before smearing the barge cement on them.
After letting them sit apart for 10-15 min, I pressed them firmly together, before adding big bulldog clips to hold the edges of the outsole tight to the rubber while the glue dries for 24 hours.
The final step was to trim the rubber back to the outsole, 24 hours or more after gluing.

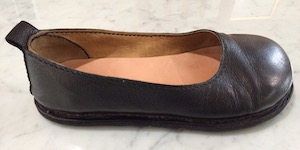
The finished pair of court shoes I made using the tozafoot method of welting. The stitching holding the single welt to the outsole is almost invisible under the curve of the shoe.
For these shoes I experimented with a new type of Vibram sole, the Freestone. It was recommended by one of my favorite repair cobblers, so I thought I would see how it compared to the Newporter, which I had used on several previous pairs, but which I thought would be a bit heavy for court shoes. The Freestone is made of IdroGrip, which is supposed to be good for wet environments (thinking of walking on concrete sidewalks in the rain). It has no built up heel, and it also appeared to have a fairly low side-on profile, which is appropriate for court shoes.
To cut a long story short, I’ve not been too impressed with the Freestone. It was much harder to trim with basic tools (scapel, knife, shears) than the Newporter. Therefore, it took considerably longer to shape, and I lacerated my hands more than usual while trimming it. What’s more, it turned out that the profile isn’t actually too enticing for a court shoe, because there is a big height difference between the bottom of the lugs and the base level of the undersole. So it looks more rugged than I would ideally like. And it has worn down fairly quickly at the heels: a few years later, I actually removed it, and replaced it with a different kind of Vibram sole.
How did the process compare with previous pairs?
This pair of shoes took me considerably less time to make than any of my previous pairs. Except for trimming the rubber sacrificial soles, every stage of the process was faster. Altogether, I spent about 90 hours, of which roughly 5 was ruber-sole trimming (I went very cautiously after I cut my hand!). I put this increase in speed entirely down to practice.
The stage of construction that took the longest was welting. Even though I had pre-cut the welt to shape and pre-punched the holes, it took about 4-5 hours per shoe to sew the welt on. I realized part- way through that poor lighting conditions were really slowing me down: I found it difficult to see the holes while putting the needles through. After this, I switched to working under a daylight spectrum task light. As ever, it seems that I need to invest more in getting good equipment to make the process quicker and less error-prone.