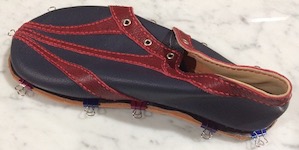
Side-fastening shoes with trompe l'oeil toes
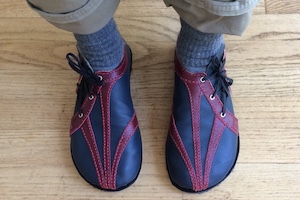
I designed the red patterning on my side-fastening shoes to fool the eye into not noticing the very wide toes, which are the same shape as the other lasted pairs I've made. Star Trek, here we come!
In making this pair, I experimented with various aspects of design and technique, trying several things:
De-emphasizing toe width
To let the toes move naturally, the toe area of the shoe should be as wide as, or even wider than the ball of the foot.
However, virtually all shoes that one can buy (for many decades now!) have tapering toes: fashion and shoemakers’ convenience trumps human anatomy and sense. How can I make my toe shape seem conventionally tapering, while still being unconventionally wide? I decided to try a combination of color and shapes to draw the eye to the center-line of the foot. To ensure this trompe l’oeil pattern remained more-or-less the same no matter how the foot was moving, I made the shoes fasten at the sides rather than down the center line of the forefoot.
Side fastening
I had never before made footwear that has a tongue and eyelets on the side of the foot, rather than at the front. I decided to make the shoes lace up on the outside of each foot (rather than at the instep), and to have a highlight collar around the shoe just under the ankle, that would flow downwards to the sole either side of the tongue, again drawing the eye away from the toe area. This collar is not padded: it’s simply a visual highlight.
Yay, we have eyelets! The setting tool is remarkably simple: an anvil on which the eyelet sits once it has been poked through the hole in the leather, and a solid cylindrical punch that is bashed with a mallet to flatten the end of the eyelet against the inside of the leather.
No reinforcing at toes and heels
In previous lasted shoes and boots, I used vegetable-tanned leather to provide reinforcement in the toe area and around the heel. Nailed to the last while wet, this stretched leather dries to form a stiff cap over the toes and the cup of the heel. However, for the current pair, I wanted to de-emphasize the wide toe shape, so I decided to forego the extra layer of toe-cap reinforcement and simply rely on the lining (3oz chrome-tanned cow-hide) to provide durability.
Eyelets
None of my previous pairs has had metal eyelets, so I thought I would try using some for the first time.
Single welt, using the tozafoot method
As in previous shoes, I wanted to use a discreet welt to fasten upper and lining to sole.
I was also keen to keep the amount of leather wastage to a minimum, so I tried to make pattern pieces be parsimonious as possible for the shapes I needed to achieve. This meant, for example, cutting the toe pattern as three separate shapes to be sewn into a converging pattern, rather than as a single three-pronged shape. I also cut the midsole from the same piece used to cut the welt.
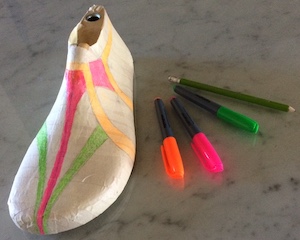
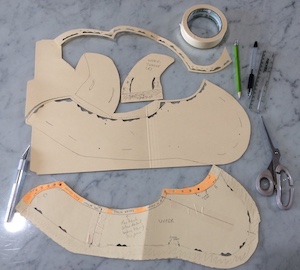
Having covered the last in masking tape in such a way that it would be possible to pull off in a single piece (in theory!), I drew my prototype design onto it using pencil and colored pens.
The pattern
Having conceived the design, I started drafting the pattern on the same last that I would later use to assemble the shoe.
I used pens to color each design element that I thought would form a different part of the pattern. When satisfied with how this appeared on the last, I cut through the masking tape with a scalpel and removed it from the last in two pieces:
- a small one used to form the pattern for the tongue
- and a big piece on which the patterns for the remainder of the upper (and lining) are based
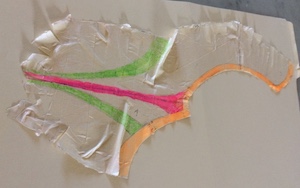
To flatten the toe and heel areas onto card, I needed to cut slits so that the masking tape could flatten in a fan shape that can be gathered together when the shoe is made in leather.
The masking tape would be impossible to flatten onto a piece of card without major wrinkling and distortion at the toe and heel, so I used scissors to cut slits into it. This enabled it to be flattened, while preserving the shape of the top of the shoe as faithfully as possible.
Having cut these slits, I pressed the tape shape onto a piece of thin card (making sure that the straight lines down the front of the foot and down the heel of the foot remained as straight as possible).
Once I'd flattened the tape with as little distortion as I could manage, I drew around it onto the card to form the pattern for most of the upper. I made sure to mark the center lines at toe and heel, as well as the points where the various colored highlights intersected each other.
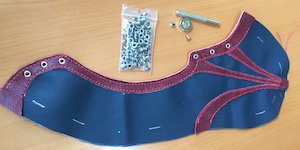
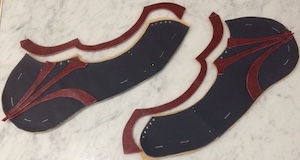
Cutting out the patterns for the upper and lining. Lasting margins and stitching lines are marked with cut-outs.
When I had the pattern for the main body of the upper marked out, and had transferred it to a separate piece of card, I then used scissors to cut out the masking tape some more to make separate patterns for all the pieces of the parts intended to be red leather (the parts colored with highlighter pen on the masking tape).
The cloth prototype shows up design flaws
Once I had the various pieces for the upper pattern, I made a prototype shoe in heavy cotton cloth, with different colored cloth to stand in for the various "trompe-oeil tapering toe" highlights.
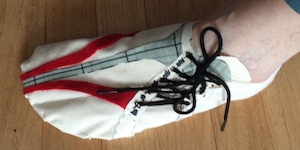
This shoe is a prototype, to check fit, and check that the design is working as intended. The cloth is simply taped (using masking tape) to a stiff cardboard sole, to provide a quick and easy simulacrum of what the eventual leather shoe will look and feel like.
This prototype showed me that the way I had envisaged the colored pattern overlapping from the main part of the upper onto the tongue of the shoe would not work on a moving foot, and would also be obscured by lacing. So I decided to omit it, and to re-work the pattern for the tongue slightly.
Having modified the pattern for the upper based on what I had learned from the cloth prototype, I made a pattern for the lining. This was simply the same as the pattern for the upper, cut slightly oversize at the top of the shoe (so that it could be trimmed back after being sewn to the upper: much easier than making it exactly to fit, then having to line everything up precisely while sewing).
For both upper and lining, I needed to mark the lines where the red leather would be sewn; I cut holes for these lines into the card using a scalpel, and used a narrow punch to mark their beginnings and ends.
Since I wanted to use the tozafoot method of welting, I also made patterns for the insole, the midsole and the welt, based on a tracing of the base of the last.
Making the shoe in leather
After making the final pattern in card, the next step was to lay the card onto leather to mark where to cut, skive and stitch the various pieces to assemble into a shoe.
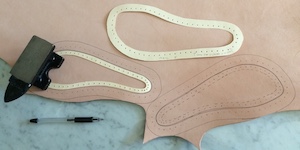
Patterns for the welt (larger piece of card) and midsole (smaller piece of card) marked onto 6oz vegetable tanned, undyed cow hide. Note that the midsole fits almost exactly inside the welt, minimizing the amount of leather wastage.
I used silver pen (which can be removed using an eraser or water) to mark the upper and lining. But, since no one will see these in the assembled shoe, I used a cheaper ink pen to demarcate the sole pieces.
I then punched stitching holes, and skived where necessary, to thin the leather where an overlap would otherwise result in too much thickness (for example, where one piece of red leather overlaid another along the edge of the upper, and the interior of the welt).
At this stage, I also dyed the top surfaces of the welts to their final color, because dying them after they’re attached to the upper carries too much risk of dye staining the upper as well as the welt.
I skived the blue leather of the uppers along its top edge, where it would attach to the red leather.
Having cut out, skived, and punched the pieces of the upper, I sewed them together using 0.8mm thread.
I then sewed the linings onto the uppers, before deploying my new tool: an eyelet setter! I used eyelets that had a 1/4′′ stalk and that fit a 3/16′′ hole (punched with a round punch). This size fit my design perfectly. The eyelet stalks had to pierce and turn back on either three or four layers of 2-3oz leather (one or two layers of red detailing, plus the blue main body of the upper, plus the lining): approximately 8oz leather altogether.
After installing the eyelets, I sewed each tongue onto the main body of the upper. Since these shoes would be made on a last, and would need to be removed from that last after the welt had been attached, I made sure to only sew a small distance up the upper from the edge of the lasting margin when attaching the tongue: I wanted as much latitude as possible to be able to pull the assembled shoe off the last!
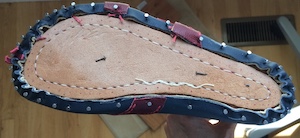
The insole with attached midsole is nailed to the sole of the last. Then, the fully-assembled upper is drawn tightly over the last and nailed to the insole around its perimeter as the lasting pliers grip the 20mm lasting margin. Once attached, the excess margin is trimmed (with a scalpel), so the remainder sits neatly abutting the midsole, as in this photo.
Having assembled the uppers, and stitched midsoles to insoles, I was ready to nail everything to the last, while checking from time to time that the upper was in the correct position.
After I’d nailed the uppers (with attached lining) onto the last, the edges of the lasting margin had to be trimmed, so that the remainder would fit neatly under the welt, abutting the edge of the midsole (see photo).
For several previous pairs of shoes, I had pre-punched holes in the midsole ready to attach to the welt. However, it was very time-consuming trying to insert the curved needles through these pre- punched holes, especially around the tight curves of toe and heel. Therefore, for the current pair, I simply used a pen to mark the expected positions of the stitching holes onto the midsole, but I did not punch the holes before starting the welting process. Rather, I used an awl to punch them as I stitched.
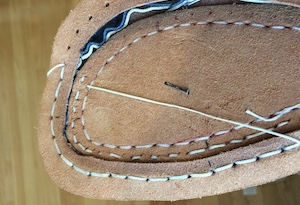
In-progress attachment of a single welt using the tozafoot method. For this pair, I did not pre-punch holes in the mid-sole, but made them as I went along, with an awl. The inner ring of stitches on the midsole is that attaching it to the insole (not visible) before everything was nailed to the last.
Furthermore, to reduce the chances of piercing the outgoing thread with a needle going in the opposite direction (all too easy when inserting a needle through a hole in the midsole that already contains a thread), I experimented with using one hole in the midsole from the midsole to the welt, and a second hole for the thread coming in from the welt to the midsole. This can be seen in the photo: around the toe area, there are two small stitches in the midsole for each of the large stitches on the welt.
Once I'd stitched the welt the entire distance around (overlapping by 3 stitches on the instep, for strength), I pulled out the two nails holding the insole to the last. Then I cut a piece of 4oz goat leather (nice and springy) to the midsole pattern and fixed it into the space bounded by the welt, using a few dabs of water-based glue (EcoWeld from Tandy Leather).
When this filler piece was glued in place, I turned the shoe over and placed it, sole-side down onto the 10oz cowhide that would form the outsole. I could then trace around the perimeter of the welt to get the shape of the outsole.
Once I had both outsoles traced, I removed each shoe from the last: a little bit of a struggle, but thanks to my foresight in not stitching the tongue far up the upper, entirely do-able even though the front of the shoe was well encased.
Bulldog clips hold the welt firmly to the outsole, ready for the stitch positions to be marked onto the outsole, through the holes punched in the welt.
In previous pairs, I had prepunched the holes to attach the welt to the outsole, but for the current pair, I marked the hole positions after I had attached the welt. First, I used a pen to make marks 8mm apart along the curved edges of a piece of stiff card: one set of marks on a concave edge and one on a convex edge. I then used this template to mark stitch positions on the top of the welt as far under the edge of the shoe as I could reach, starting at the instep. I then punched holes in these positions with a 00 punch.
Trimming the surplus outsole would be better done with a lip knife! Using my trim knife there’s a non-negligible risk of slicing into the upper, even though the shoe has been removed from the rigid last.
I was then able to transfer these stitch positions to the outsole, punch them, and then carve a shallow groove connecting these holes in the bottom of the outsole.
All that remained was to sew the outsole to the welt with 1mm Ritza/Tiger thread. Again, I used curved needles, to avoid stabbing the upper as much as possible, and bulldog clips to hold everything in alignment.
The thread connecting the welt to the outsole sits in the groove, so that the entire outsole remains flat enough to glue a rubber sole to the bottom of it.
Now the outsole was firmly attached, it and the welt could be trimmed to make the edges as neat and close to the stitching line as possible (see photo).
Trimming complete, I very briefly sanded the edges of the outsole and welt by hand, using 400 grit sandpaper, before dying them black (Fieblings leather dye) to match the top of the welt.
I also cut a sock (effectively an inner insole) from 6oz undyed, vegetable- tanned cowhide to go inside each shoe on top of the insole. There is no need to glue it in: it is slightly larger than the insole, so is held in place by friction.
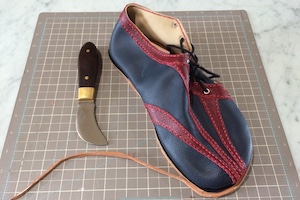
Onto the final step! And the stinkiest. Gluing on Vibram soles is something that I hate doing, but it’s necessary if I want a durable and grippy sacrificial sole on the bottom of the shoe. As I have done for previous pairs, I attached Newporter large men’s blank soles using barge cement, and left them to cure overnight with everything clamped together using large bulldog clips. I then trimmed off the excess rubber using a scalpel (wearing leather gloves in case the scalpel slipped). After inserting some shoe laces, the shoes were ready to wear!